ListView in JavaFX Tutorial
If you know the JavaFX ComboBox, the pop-up menu in the ComboBox is the same scenario as the ListView in JavaFX. The JavaFX ListView allows the user to select one or multiple items from a list of items. ComboBox and JavaFX ChoiceBox are almost the same code as the ListView; it is easy to use and learn.
List view in JavaFX is useful when your application requires a list of items to choose from the user, it could be a single or multiple selections. This node or control has a selection model that stores the state of every selected item from the ListView. It has a selection Model property that is used to find the selection model. You can configure the selection modes by using the:
- Single Selection Mode
- and the Multiple Selection Mode.
It is easy to understand the selection modes; the Single Selection Mode is you can only select one item at a time. Otherwise, the Multiple Selection Mode can select multiple items at the same time by pressing and holding the CTRL key on the keyboard and clicking the items at the same time. The ListView in JavaFX does have more features to learn, but this tutorial will guide you through the basics or somewhat fundamentals for you to start learning the ListView in JavaFX.
How to use the ListView in JavaFX
The JavaFX ListView is very easy to learn and use. In this tutorial, you will learn how to create the list view, add items to the list view, and get the selected item, and will show you more features in the following examples below. This tutorial will assure you that you can learn something new here as a beginner. Please proceed below to learn more about the List View in JavaFX.
Create the JavaFX ListView
It is very easy to create the List view. You need to create an object from the list view by instantiating the ListView class. The code snippet below will be the instantiation of the ListView.
ListView<String> listView = new ListView();
Use the Scene Builder application to create the ListView easily. You can easily drag and drop the nodes or components. You can also watch the video tutorial below to learn more.
Add items to the ListView
To add items to the JavaFX list view, you need to use the getItems() method and addAdd() or addAll() methods. There are ways to add items to the ListView in JavaFX. The following code snippet will show you the methods of adding items to the list view. Please proceed below to learn more.
// First method
String[] items = {"Java","C#","PHP","Python","JavaScript"};
ListView<String> listView = new ListView<String>();
listView.getItems().addAll(items);

// second method
listView.getItems().add("Single Item");

// third method
listView.getItems().addAll("Item 1","Item 2","Item 3");
Display the ListView to the Scene Graph
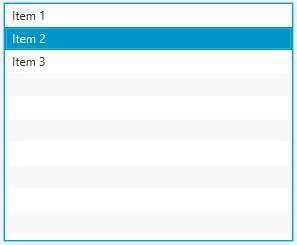
You need to add the list view to the Scene Graph to make it visible to the user. You will need the JavaFX Layout to wrap the node and add it to the scene. If you don’t know how to use the JavaFX Layout, you can click the link to learn more. The following example code below will teach you how to make your list view visible in your application.
// this example is not using the scene builder
StackPane layout = new StackPane();
Scene scene = new Scene(layout, 400, 400);

ListView<String> list = new ListView<String>();
layout.getChildren().add(list);
stage.setScene(scene);
stage.show();
Output
Determine the selected value
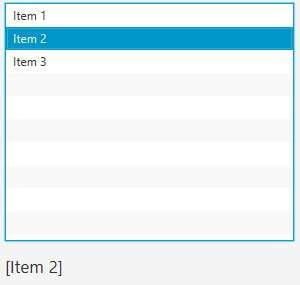
Getting the selected value when you select an item from the JavaFX ListView is very easy. You need to its selectedItemProperty() and addListener() to make it work. The following example below will show you how to get the selected item.
// inside the initialize method
listView.getSelectionModel().selectedItemProperty().addListener(this::selectionChanged);

// make another method as selectionChanged
private void selectionChanged(ObservableValue<? extends String> Observable, String oldVal, String newVal){
    ObserVableList<String> selectedItems = listView.getSelectionModel().getSelectedItems();
    String getSelectedItem = (SelectedItems.isEmpty())?"No selected Item":selectedItems.toString();
    System.out.println(getSelectedItem);
}
Output
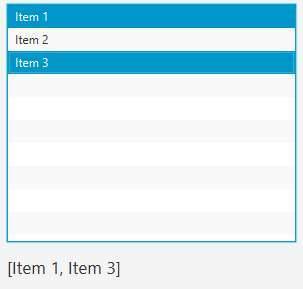
Enable the multiple items to be selected
The example code above is for multiple items and the multiple items are disabled by default because it is using the single selection mode. The multiple items mean you can select many or multiple items in the JavaFX List View. To allow the multiple selection mode, you need to use the setSelectionMode() method via getSelectionModel(). The following example below will show you how to allow the multiple-selection mode.
//Allowing the multiple selection mode
listView.getSelectionModel().setSelectionMode(SelectionMode.MULTIPLE);
Output
ListView Orientation
You can also set the JavaFX List View, changing the orientation of the List View depending on your application requirements. You can set it to horizontal or vertical orientation. If you set the orientation to Horizontal, your list of items will move from left to right. Otherwise, top to bottom if you set the orientation to vertical. The following example code below will show you how to change the JavaFX ListView orientation.
// Arrange the list to horizontal
listView.setOrientation(Orientation.HORIZONTAL);

// Arrange the list to Vertical
listView.setOrientation(Orientation.VERTICAL);
ListView Selection Model
You can select items in the list view using buttons or whatever nodes you want to use to select or clear selection. Using the getSelectionModel() method you can achieve this kind of feature. Watch the YouTube video below to learn more.
// use these in the Action event

listView.getSelectionModel().clearSelection();
listView.getSelectionModel().selectAll();
listView.getSelectionModel().selectFirst();
listView.getSelectionModel().selectLast();
listView.getSelectionModel().selectNext();
listView.getSelectionModel().selectPrevious();


