Kensoft PH
  • Download
  • Contact
  • About
Java Quiz
No Result
View All Result
Kensoft PH
  • Download
  • Contact
  • About
Java Quiz
No Result
View All Result
Kensoft PH
No Result
View All Result
Home Java

How to connect Java to MySQL database using Xampp server | 100% best for beginners

October 27, 2020 - Updated on January 23, 2023
in Java
Reading Time: 3 mins read
1
MySQL database using XAMPP
12.1k
VIEWS
Share on FacebookShare on TwitterShare via Email

Connecting our application to a MySQL database using XAMPP is very important to make the data persistent. Your application must have a database like MySQL to store the data from the user or from the application itself.

For example, your application doesn’t have a database, and the user inputs their important information. After closing and reopening the application, you will notice that the data is gone because the application doesn’t have a database. There are so many databases to learn and integrate with your application.

In terms of development with a database, XAMPP is very useful for managing the database in development. XAMPP allows you to manage the Apache server and databases offline using PhpMyAdmin, at your localhost. Using XAMPP, you can connect your Java application to the MySQL database using XAMPP. Connecting your application to the MySQL database using XAMPP is very easy, but before doing that. We need to have XAMPP and MySQL JDBC driver to allow us to connect to the database.

To download the XAMPP application and MySQL JDBC driver, please proceed below.

  • Download XAMPP
  • Download MySQL JDBC driver

Contents

  • Installing XAMPP on Windows
  • How to connect Java MySQL database using XAMPP
  • YouTube Video

Installing XAMPP on Windows

Installing XAMPP on Windows is very easy. After you download the application, install it. When the setup is running, click next to proceed to the installation. When you see the “Select Components,” I recommend you select all and click next. If you see “C:\xampp” in the installation folder, you can set the path you want, but it is up to you. Then click on next until the installation process is running.

After the installation, you can run XAMPP and see its control panel. The control panel has modules, and you can start the Apache server and MySQL server to make a database for development. To create a database, click on the admin button inline with MySQL, and you will be redirected to PhpMyAdmin localhost. Suppose you are ready to connect your Java application to the MySQL database using XAMPP. Please proceed below to learn more.

How to connect Java MySQL database using XAMPP

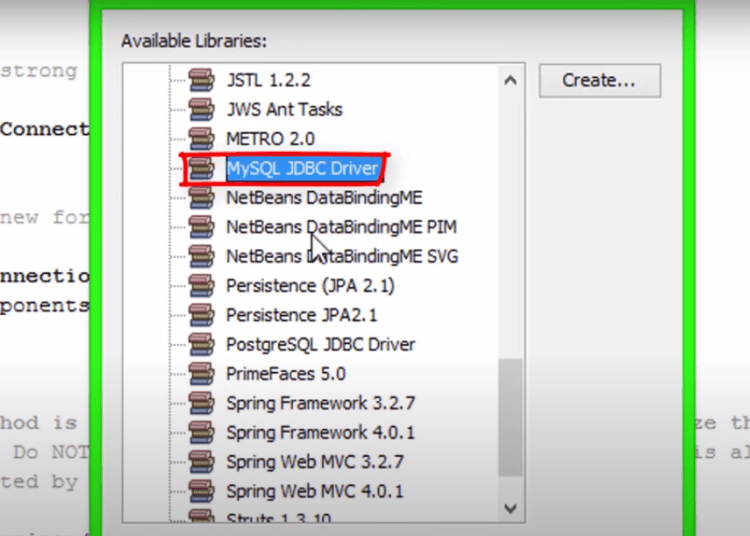
The first step is to create your Java project. Go to Libraries (right-click to add library) under your project below the Source packages in your Java project. Then, add the MySQL JDBC Driver. If you don’t have the library, click on the create button on the right side. Set the Library name and click OK. On the classpath tab, add the jar from the driver you have downloaded.

MySQL database using XAMPP

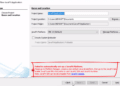
Navigate to the Services tab and right-click on Database to create a new connection. On the New Connection Wizard window, select the MySQL driver (connector / J driver). MySQL database using XAMPP


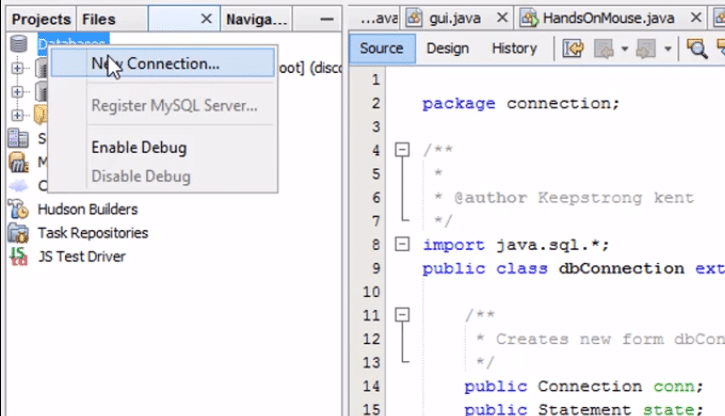
In Customize connection, enter your database name and test the connection and copy the JDBC URL for later.MySQL database using XAMPP

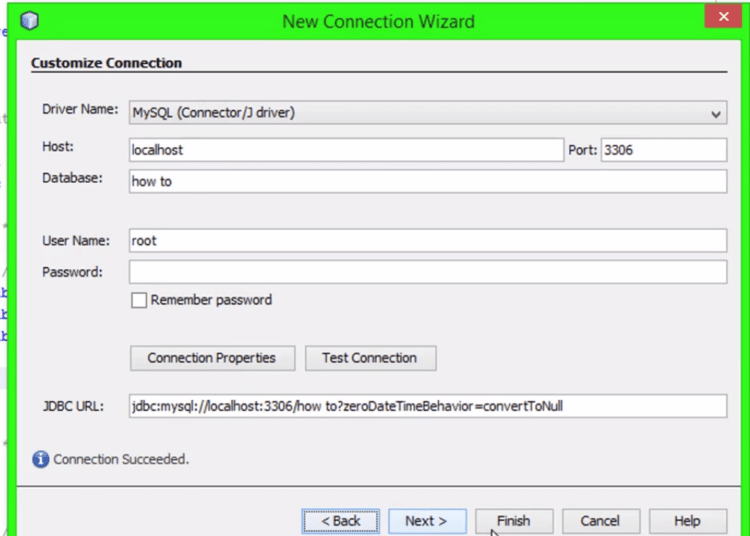
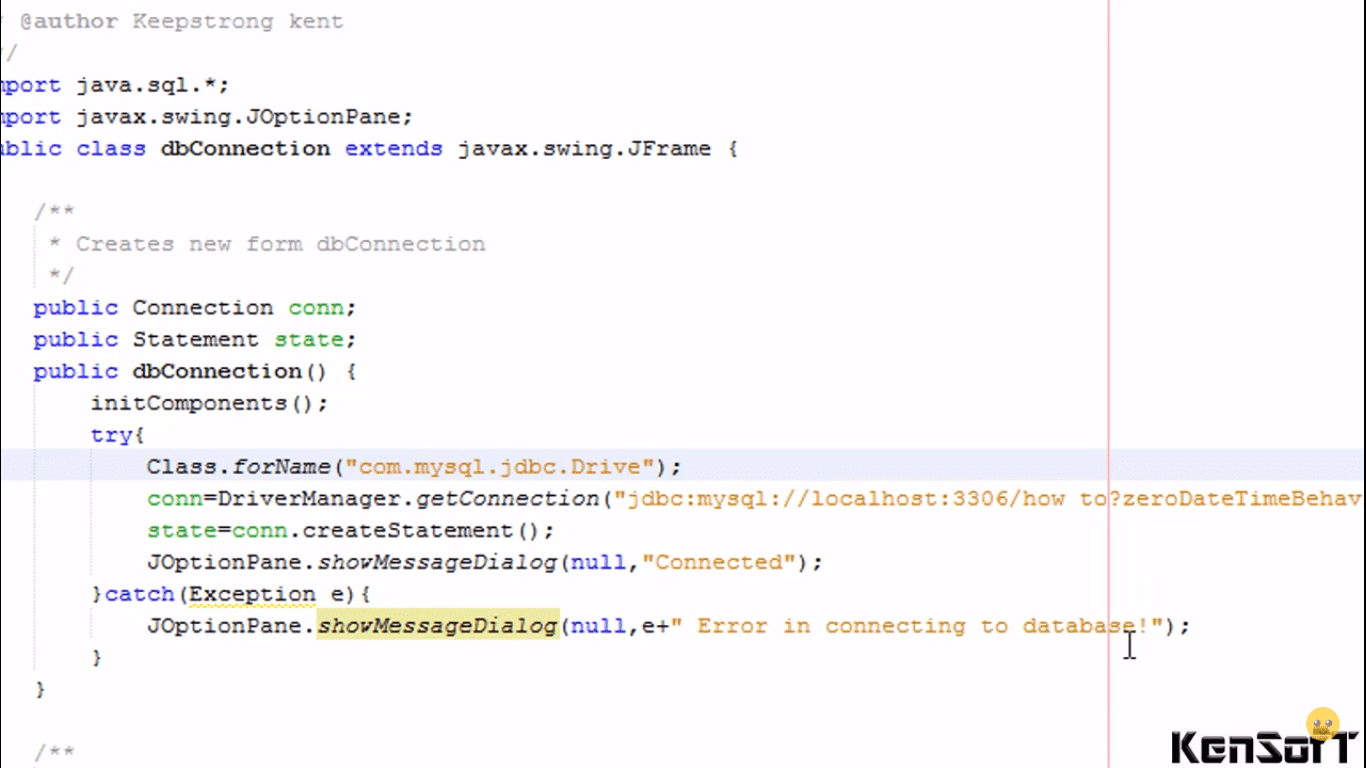
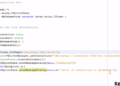
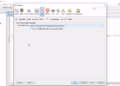
Code for the connection to the database.

public static void main(String[] args) {
    try{
        Class.forName("com.mysql.cj.jdbc.Driver");
        Connection con = DriverManager.getConnection("dbURL","username","password");
        Statement state = con.createStatement();
        System.out.println("connected");
    }catch(Exception e){
        e.printStackTrace();
    }
}

MySQL database using XAMPP

YouTube Video

Previous Post

Java Hover Effect | 100% best for beginners

Next Post

How to use CRUD in Java programming | 100% best for beginners

KENSOFT

KENSOFT

What’s up! Kent is my name. The name KENSOFT is derived from the words Kent and Software. My programming language of choice is Java

Related tutorials

JavaFX DirectoryChooser: 100% Perfect Step-By-Step Guide
Java

JavaFX DirectoryChooser: 100% Perfect Step-By-Step Guide

March 26, 2023
2
File Chooser in JavaFX Tutorial
Java

File Chooser in JavaFX: 100% Perfect Step-by-Step Guide

March 4, 2023
18
JavaFX TabPane Tutorial
Java

How to use the TabPane in JavaFX | 100% Perfect Tutorial

March 2, 2023
11
Next Post
crud in java

How to use CRUD in Java programming | 100% best for beginners

Graphical User Interface

100% best Java swing mailing Graphical User Interface (GUI)

send email using java

Java Send Email Tutorial | 100% Best for beginners

Comments 1

  1. Avatar of Gregorr Gregorr says:
    2 years ago

    Thank you for sharing. Informative!

    0
    0
    Reply

Leave a Reply Cancel reply

Your email address will not be published. Required fields are marked *

Maximum upload file size: 20 MB. You can upload: image, audio, video, document, text. Drop files here

  • Trending
  • Comments
  • Latest
Failed to automatically set up a JavaFX Platform

Failed to automatically set up a JavaFX Platform SOLVED Apache NetBeans 12.3 | Best way

April 11, 2021 - Updated on July 3, 2022
MySQL database using XAMPP

How to connect Java to MySQL database using Xampp server | 100% best for beginners

October 27, 2020 - Updated on January 23, 2023
JavaFX 17

How To install JDK 17 and JavaFX 17 on NetBeans IDE | Best

November 15, 2021 - Updated on December 13, 2021
change the stage icon in JavaFX

How to change the stage icon in JavaFX | 100% best for beginners

May 23, 2021 - Updated on September 24, 2022
Failed to automatically set up a JavaFX Platform

Failed to automatically set up a JavaFX Platform SOLVED Apache NetBeans 12.3 | Best way

send SMS in java

How to send SMS in Java | 100% best example

3DES in Java and AES in Java

How to use AES and 3DES in Java | 100% best for beginners

JavaFX Splash Screen

How to create JavaFX Splash Screen | 100% best for beginners

JavaFX DirectoryChooser: 100% Perfect Step-By-Step Guide

JavaFX DirectoryChooser: 100% Perfect Step-By-Step Guide

March 26, 2023
File Chooser in JavaFX Tutorial

File Chooser in JavaFX: 100% Perfect Step-by-Step Guide

March 4, 2023
JavaFX TabPane Tutorial

How to use the TabPane in JavaFX | 100% Perfect Tutorial

March 2, 2023
How to use the JavaFX ToolBar

How to use the JavaFX ToolBar | 100% Perfect Tutorial

January 24, 2023

Latest Tutorials

JavaFX DirectoryChooser: 100% Perfect Step-By-Step Guide

JavaFX DirectoryChooser: 100% Perfect Step-By-Step Guide

March 26, 2023
File Chooser in JavaFX Tutorial

File Chooser in JavaFX: 100% Perfect Step-by-Step Guide

March 4, 2023
JavaFX TabPane Tutorial

How to use the TabPane in JavaFX | 100% Perfect Tutorial

March 2, 2023

Popular Tutorials

  • Failed to automatically set up a JavaFX Platform

    Failed to automatically set up a JavaFX Platform SOLVED Apache NetBeans 12.3 | Best way

    0 shares
    Share 0 Tweet 0
  • How to connect Java to MySQL database using Xampp server | 100% best for beginners

    0 shares
    Share 0 Tweet 0
  • How To install JDK 17 and JavaFX 17 on NetBeans IDE | Best

    0 shares
    Share 0 Tweet 0
Facebook Instagram Youtube Github LinkedIn Discord
Kensoft PH

What’s up! Kent is my name. The name KENSOFT is derived from the words Kent and Software. My programming language of choice is Java, which I use to create computer applications. In a company, I created applications and a website.

Website

Privacy Policy

Terms and Condition

Sitemap

Services

Guest Post

Fiverr

Freelancer

Upwork

Categories

Website Status

Check the status

Latest Tutorials

JavaFX DirectoryChooser: 100% Perfect Step-By-Step Guide

JavaFX DirectoryChooser: 100% Perfect Step-By-Step Guide

March 26, 2023
File Chooser in JavaFX Tutorial

File Chooser in JavaFX: 100% Perfect Step-by-Step Guide

March 4, 2023
JavaFX TabPane Tutorial

How to use the TabPane in JavaFX | 100% Perfect Tutorial

March 2, 2023

© 2023 Made With Love By KENSOFT PH

No Result
View All Result
  • Download
  • Java Quiz
  • Contact
  • About

© 2023 Made With Love By KENSOFT PH

This website uses cookies. By continuing to use this website you are giving consent to cookies being used. Visit our Privacy and Cookie Policy.