How to use the HBox in JavaFX
Hbox in JavaFX arranges its children in a horizontal row style, which means that if you are going to add the HBox to your JavaFX application and add nodes in the HBox. JavaFX HBox automatically lays out its children in a single horizontal row design. This layout helps you create your design easily if you want your nodes to be arranged nicely in a horizontal row.
When you add nodes inside the HBox, you cannot set the node’s location in the HBox because the JavaFX HBox automatically computes them. Still, you can control the location manually by customizing the properties of the HBox and setting constraints on the children.
Creating the JavaFX HBox
To create the JavaFX Hbox, we need to make the HBox object using the HBox constructor. We can create the HBox objects with or without setting the spacing and the initial set of children. The following example below will show you how to create an empty HBox, create the HBox with spacing, and create the HBox with spacing and initial children. Take a look at the given code below.
// Creates an empty HBox
HBox obj1 = new HBox();

// Creates an HBox with spacing of 15px
HBox obj2 = new HBox(15);

// Creates an HBox with spacing and initial children
Button btn1 = new Button("Button 1");
Button btn2 = new Button("Button 2");

HBox obj3 = new HBox(15, btn1, btn2);
There are some HBox properties that you should be aware of. The following three HBox properties are listed below.
- alignment – The alignment property helps you align the nodes inside the HBox layout area. The fillHeight property is ignored if the vertical alignment is set to BASELINE.
- fillHeight – This property is used to specify the resizable children to fill the full height of the HBox. Please know that this property is ignored if the vertical alignment is set to BASELINE.
- spacing – This property is used to specify the spacing of the children. The default value is set to 0.
Now, let us go over each of the properties and show you examples of each. Let’s start with:
Alignment Property
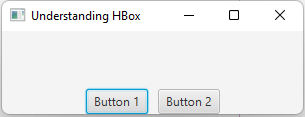
The Alignment property is effortless to use, and it is used to specify how the nodes are aligned within the content area of the HBox. HBox in JavaFX allocates just enough space for its content to layout all children at their preferred size. The Alignment property has several geometry positions, like BASELINE_CENTER, BASELINE_LEFT, BASELINE_RIGHT, BOTTOM_CENTER, BOTTOM_LEFT, BOTTOM_RIGHT, CENTER, CENTER_LEFT, CENTER_RIGHT, TOP_CENTER, TOP_LEFT, and TOP_RIGHT. You may notice the effect of the alignment property if the JavaFX HBox is bigger than its preferred size. The following example will show how the alignment property is used in the JavaFX program.
// Setting the alignment of the children
root.setAlignment(Pos.BOTTOM_CENTER);
Output
FillHeight Property
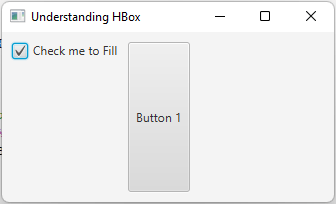
The FillHeight property specifies the resizable node to fill the full height of the content area of the HBox. Note that this property only affects nodes that allow for vertical expansion. For example, if you have a button inside your HBox and the maximum height of the button is based on its preferred height, this doesn’t expand the button if you use the fillHeight property. To expand the button, you need to set its maximum height to Double.MAX_VALUE. If you don’t want to fill the children’s height or nodes, you can disable it by setting the fillHeight property to false. The following example will show how the fillHeight property is used.
HBox root = new HBox(10);
root.setPrefSize(600, 400);

Button btn1 = new Button("Button 1");
btn1.setMaxHeight(Double.MAX_VALUE);
CheckBox chkBox = new CheckBox("Check me to Fill");
chkBox.setSelected(true);

// Setting the FillHeight
chkBox.setOnAction(event ->{
    root.setFillHeight(chkBox.isSelected());
});

root.setStyle("-fx-padding: 10;");

root.getChildren().addAll(chkBox, btn1);

Scene scene = new Scene(root);
stage.setScene(scene);
stage.setTitle("Understanding HBox");
stage.show();
Output
Spacing Property
This property is also straightforward to use. The Spacing property specifies the horizontal distance between the nodes in an HBox. The default value of the spacing is set to 0px. To set the spacing, you can set it using the setSpacing() method or in constructors. To apply the spacing between the children of the HBox, It should be like this. root.setSpacing(10);. If you don’t want to use the setSpacing() method, you may also use the constructor like HBox root = new HBox(10);.
There is another feature in HBox. You can let the nodes or children grow horizontally by using the setHgrow() method. The hgrow constraints specify whether a node expands horizontally when additional space is available.
The HBox class provides setHgrow() and setMargin() method to specify these constraints. The following code is an example of setting the Hgrow method, HBox.setHgrow(textField, Priority.ALWAYS); if you want to add margins, do this. HBox.setMargin(textField, new Insets(10,2,10,2));. The first 10 in the Insets parameter is for top margin 10px, 2px for right, 10px for bottom, 2px for left.


