Java – Kensoft PH https://kensoftph.com Power up your knowledge in programming Sun, 06 Oct 2024 13:40:21 +0000 en-US hourly 1 https://wordpress.org/?v=6.7.1 https://kensoftph.com/wp-content/uploads/2021/07/cropped-Kensoftph-New-logo-32x32.png Java – Kensoft PH https://kensoftph.com 32 32 How to Use the JavaFX Pie Chart 100% For Beginners https://kensoftph.com/how-to-use-the-javafx-pie-chart/ https://kensoftph.com/how-to-use-the-javafx-pie-chart/#respond Wed, 12 Jun 2024 05:48:46 +0000 https://kensoftph.com/?p=4047 Master JavaFX Pie Charts effortlessly with our beginner-friendly guide, providing step-by-step instructions for setting up, coding, and styling interactive charts.

Key Takeaway:

  • JavaFX Pie Charts simplify data visualization by displaying data in engaging, circular graphs.
  • Essential steps include setting up your environment, adding libraries, and coding.
  • Customize with CSS for enhanced visual appeal.

How to Use the JavaFX Pie Chart

Have you ever wondered how to visualize data in a more engaging and visually appealing way using JavaFX? Well, you’re in the right place! In today’s blog post, I’m diving deep into the world of the JavaFX Pie Chart. Whether you’re a seasoned developer or just getting started, this guide will be your go-to resource for creating dynamic and interactive pie charts using JavaFX. So let’s get started!

Introduction to JavaFX Pie Charts

JavaFX provides an extensive framework for building rich graphical user interfaces (GUIs). One of the most useful and visually effective components is the Pie Chart. A JavaFX Pie Chart allows you to display data in a circular graph divided into slices, making it easier to understand complex data sets at a glance.

Why Use a Pie Chart?

Before we jump into the coding part, you might ask: Why even use a pie chart? Well, pie charts are incredibly effective for showing the relative proportions of different categories in a data set. They are easy to understand and can be very informative when used correctly. From business presentations to educational materials, pie charts help convey information clearly and succinctly.

Setting Up Your JavaFX Environment

To create a JavaFX Pie Chart, you’ll need to have Java Development Kit (JDK) installed along with an Integrated Development Environment (IDE) like IntelliJ IDEA or Eclipse.

  1. Install JDK: Download and install the latest version of the JDK from Oracle’s website.
  2. IDE Setup: Download and install an IDE such as IntelliJ IDEA or Eclipse.

Creating Your First JavaFX Pie Chart

Alright, let’s get our hands dirty with some code! We’ll start by creating a simple JavaFX Pie Chart step-by-step.

Step 1: Set Up Your Project

First things first, create a new JavaFX project in your IDE. If you’re using IntelliJ IDEA:

  1. Open IntelliJ IDEA and select New Project.
  2. Choose JavaFX from the list of templates.
  3. Configure your project settings and click Finish.

Step 2: Adding JavaFX Libraries

Ensure that your project is set up with JavaFX libraries. You might need to add the JavaFX SDK to your project manually.

  1. Download the JavaFX SDK from Gluon.
  2. Configure your project to include the JavaFX libraries.

Step 3: Coding the Main Class

Once you’ve created a new JavaFX Project in Intellij IDEA, it will create the boilerplate. So head over to your Main class and copy the code below.

package com.kensoftph.javafxpiechart;

import javafx.application.Application;
import javafx.fxml.FXMLLoader;
import javafx.scene.Scene;
import javafx.stage.Stage;

import java.io.IOException;

public class HelloApplication extends Application {
    @Override
    public void start(Stage stage) throws IOException {
        FXMLLoader fxmlLoader = new FXMLLoader(HelloApplication.class.getResource("hello-view.fxml"));
        Scene scene = new Scene(fxmlLoader.load());
        stage.setTitle("World Population");
        stage.setScene(scene);
        stage.show();
    }

    public static void main(String[] args) {
        launch();
    }
}

Step 4: Coding the FXML File

If you have a scene builder, you can configure or develop your desired interface for your application. Otherwise, copy the code below to match the given example.

<?xml version="1.0" encoding="UTF-8"?>

<?import javafx.geometry.Insets?>
<?import javafx.scene.chart.PieChart?>
<?import javafx.scene.control.Label?>
<?import javafx.scene.layout.BorderPane?>
<?import javafx.scene.text.Font?>


<BorderPane maxHeight="-Infinity" maxWidth="-Infinity" minHeight="-Infinity" minWidth="-Infinity" prefHeight="600.0" prefWidth="800.0" xmlns="http://javafx.com/javafx/18" xmlns:fx="http://javafx.com/fxml/1" fx:controller="com.kensoftph.javafxpiechart.HelloController">
   <top>
      <Label text="Top 5" BorderPane.alignment="CENTER">
         <font>
            <Font size="40.0" />
         </font>
         <padding>
            <Insets bottom="10.0" />
         </padding>
      </Label>
   </top>
   <center>
      <PieChart fx:id="pieChart" BorderPane.alignment="CENTER" />
   </center>
</BorderPane>

Step 5: Creating another class for the Data handler

Create another Java class and this class will serve as the data handler for our JavaFX Pie Chart. Copy the code below.

package com.kensoftph.javafxpiechart;

import javafx.collections.FXCollections;
import javafx.collections.ObservableList;
import javafx.scene.chart.PieChart;

public class PieChartData {
    public static ObservableList<PieChart.Data> getChartData() {
        ObservableList<PieChart.Data> data = FXCollections.observableArrayList();
        data.add(new PieChart.Data("China", 1425000000));
        data.add(new PieChart.Data("India", 1419000000));
        data.add(new PieChart.Data("USA", 333500000));
        data.add(new PieChart.Data("Indonesia", 276700000));
        data.add(new PieChart.Data("Pakistan", 240500000));

        return data;
    }
}

Step 6: Controller Class

This controller class is connected to our FXML file.

package com.kensoftph.javafxpiechart;

import javafx.application.Platform;
import javafx.fxml.FXML;
import javafx.fxml.Initializable;
import javafx.geometry.Side;
import javafx.scene.Scene;
import javafx.scene.chart.PieChart;

import java.net.URL;
import java.util.Objects;
import java.util.ResourceBundle;

public class HelloController implements Initializable {
    @FXML
    private PieChart pieChart;

    @Override
    public void initialize(URL url, ResourceBundle resourceBundle) {
        pieChart.setTitle("World Population");
        pieChart.setLegendVisible(true);
        pieChart.setLegendSide(Side.LEFT);
        pieChart.setData(PieChartData.getChartData());

        Platform.runLater(() -> {
            Scene scene = pieChart.getScene();
            String cssPath = Objects.requireNonNull(HelloController.class.getResource("pie.css")).toExternalForm();
            scene.getStylesheets().add(cssPath);
        });
    }
}

Styling with CSS

JavaFX allows you to apply CSS to your components for better visual customization.

Create a CSS file named pie.css in your project:

.chart-pie.data0 {
    -fx-background-image: url("./flag/china.png");
    -fx-background-size: cover;
    -fx-background-position: center;
    -fx-background-repeat: repeat;
}

.chart-pie.data1 {
    -fx-background-image: url("./flag/india.png");
    -fx-background-size: cover;
    -fx-background-position: center;
    -fx-background-repeat: repeat;
}

.chart-pie.data2 {
    -fx-background-image: url("./flag/usa.png");
    -fx-background-size: cover;
    -fx-background-position: center;
    -fx-background-repeat: repeat;
}

.chart-pie.data3 {
    -fx-background-image: url("./flag/indonesia.png");
    -fx-background-size: cover;
    -fx-background-position: center;
    -fx-background-repeat: repeat;
}

.chart-pie.data4 {
    -fx-background-image: url("./flag/pakistan.png");
    -fx-background-size: cover;
    -fx-background-position: center;
    -fx-background-repeat: repeat;
}

.chart-legend-item-symbol {
    -fx-pref-width: 100;
    -fx-pref-height: 40;
}

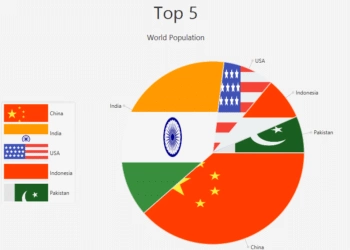
Output

JavaFX Pie Chart

Final Thoughts and Tips

Creating a JavaFX Pie Chart is not only straightforward but also fun. It makes data visualization intuitive and visually appealing. Here are a few closing tips to keep in mind:

  • Experiment with Data: Don’t be afraid to experiment with different data sets and see how the pie chart can best represent your information.
  • Explore CSS: Utilize CSS for better styling and customization. It can transform a basic pie chart into something more appealing.
  • Interactive Elements: Add interactive elements to make your charts responsive to user actions.

Now that you have a comprehensive understanding of how to create and customize JavaFX Pie Charts, why not give it a try? Experiment with your data, customize the visuals, and share your creations. And if you have any questions or run into issues, feel free to leave a comment below. I’d love to hear from you and see what you come up with!

Question: How do you create a JavaFX Pie Chart for beginners?

To create a JavaFX Pie Chart, set up your environment with JDK and an IDE like IntelliJ. Add JavaFX libraries, code your main class, and style with CSS for better visualization. Follow our step-by-step guide for effortless implementation.

YouTube Video

]]>
https://kensoftph.com/how-to-use-the-javafx-pie-chart/feed/ 0 JavaFX Pie Chart - World Population with National Flag nonadult
How to Connect to an API Using JavaFX https://kensoftph.com/how-to-connect-to-an-api-using-javafx/ https://kensoftph.com/how-to-connect-to-an-api-using-javafx/#respond Sun, 26 May 2024 13:00:24 +0000 https://kensoftph.com/?p=4024

Discover how to effortlessly connect your JavaFX application to an API, fetching delightful dog images using Java and JSON.

Key Takeaways

  • Learn to connect JavaFX applications to APIs.
  • Utilize Maven for project setup and dependencies.
  • Design GUI using Scene Builder.
  • Fetch and display images from The Dog API using Java and JSON.

How to Connect to an API Using JavaFX

Hey there! Ever wondered how you can add a touch of the internet’s charm—like fetching dog images—right into your JavaFX application? Today, we’re going to explore how to connect to an API using JavaFX with a concrete example: The Dog API.

Before we dive in, kick back, relax, and maybe grab a cup of coffee. This tutorial is designed to be detailed, informative, and most importantly, fun! We’ll get started with building a JavaFX interface and then connect it to a web API. By the end, you’ll be able to fetch and display heartwarming dog images right in your JavaFX app.

Setting Up the JavaFX Project

First things first: you need to set up a JavaFX project. Here, I’ll walk you through setting up your IDE and project dependencies.

Step 1: Create a New Maven Project

Open your favorite IDE (like IntelliJ IDEA because I’m using IntelliJ), and create a new Maven project. Maven helps in managing the dependencies and makes things easier as your project grows.

Step 2: Add Dependencies

Inside your pom.xml file, add the following dependencies for JSONObject and okhttp (which we’ll use to make API calls):

<dependency>
    <groupId>com.squareup.okhttp3</groupId>
    <artifactId>okhttp</artifactId>
    <version>5.0.0-alpha.14</version>
</dependency>
<dependency>
    <groupId>org.json</groupId>
    <artifactId>json</artifactId>
    <version>20240303</version>
</dependency>

Make sure to refresh your Maven project to download these dependencies.

Creating the GUI with Scene Builder

Now, let’s create a simple GUI using JavaFX and Scene Builder. This interface will consist of a button to fetch the data and an image view to display the fetched image.

Step 1: Open Scene Builder

If you don’t have Scene Builder, download it from here. Open Scene Builder and create a new FXML file.

Step 2: Design Your Interface

  1. Layout: Use a BorderPane.
  2. VBox: Insert a VBox at the top.
  3. Label and Button: Inside the VBox, place a Label and a Button. The label can have a text “Fetch Dog Image” and the button labeled simply as “Fetch”.
  4. ImageView: Insert an ImageView in the center of the BorderPane.

Make sure to assign FX IDs and action events to the elements. For example:

  • Assign id = imageView to the ImageView
  • Set an onAction attribute for the button to call a method in the controller, for example, btn.

Connecting to The Dog API

Now that our interface is ready, we can connect to The Dog API to fetch random dog images.

Step 1: Set Up the Controller

Create a new controller class for your FXML file. Let’s call it HelloController.

package com.kensoftph.javafxapi;

import javafx.event.ActionEvent;
import javafx.fxml.FXML;
import javafx.scene.image.Image;
import javafx.scene.image.ImageView;
import okhttp3.OkHttpClient;
import okhttp3.Request;
import okhttp3.Response;
import org.json.JSONObject;

import java.io.IOException;

public class HelloController {
    @FXML
    private ImageView imageView;

    @FXML
    private void btn(ActionEvent event){
        OkHttpClient client = new OkHttpClient();

        Request request = new Request.Builder()
                .url("https://dog.ceo/api/breeds/image/random")
                .build();

        try(Response response = client.newCall(request).execute()){
            String body = response.body().string();

            System.out.println(body);

            JSONObject jsonObject = new JSONObject(body);
            String imageURL = jsonObject.getString("message");

            Image image = new Image(imageURL);
            imageView.setImage(image);
            imageView.setFitWidth(image.getWidth());
            imageView.setFitHeight(image.getWidth());
        }catch (IOException e){
            e.printStackTrace();
        }
    }
}

Handling JSON Data

In this step, we parse the JSON data received from the API to extract the URL of the dog image.

  • We’re using org.json.JSONObject to parse the JSON data.
  • We get the message field from the JSON response, which contains the image URL.

Displaying the Fetched Image

To display the fetched image, we need to update the UI components from the main application thread to update the ImageView.

private void btn(ActionEvent event){
        OkHttpClient client = new OkHttpClient();

        Request request = new Request.Builder()
                .url("https://dog.ceo/api/breeds/image/random")
                .build();

        try(Response response = client.newCall(request).execute()){
            String body = response.body().string();

            System.out.println(body);

            JSONObject jsonObject = new JSONObject(body);
            String imageURL = jsonObject.getString("message");

            Image image = new Image(imageURL);
            imageView.setImage(image);
            imageView.setFitWidth(image.getWidth());
            imageView.setFitHeight(image.getWidth());
        }catch (IOException e){
            e.printStackTrace();
        }
    }

Final Touches

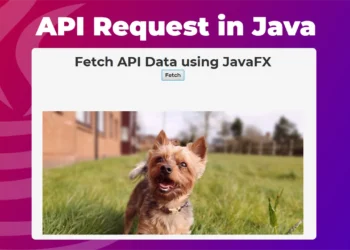
Now, let’s test our application. Run your JavaFX application, click the “Fetch” button, and you should see a random dog image appear!

How to Connect to an API Using JavaFX

Conclusion

And there you have it—a fully functioning JavaFX application that fetches and displays random dog images from The Dog API. Whether you’re building this as a fun side project or as part of a bigger application, understanding how to connect to an API using JavaFX is a valuable skill.

Feel free to add more features, like selecting different dog breeds or saving your favorite images. The possibilities are endless!

If you have any questions or run into issues, don’t hesitate to ask in the comments. I’d love to see what you build using this tutorial.

Your turn: Have you ever connected an API to a JavaFX application before? What challenges did you face, and how did you overcome them? Share your experiences in the comments below!

How to Connect JavaFX to an API

To connect JavaFX to an API, set up a Maven project with necessary dependencies, design your GUI using Scene Builder, and use the Java library OkHttp to fetch data. Display the fetched data in your application effortlessly.

]]>
https://kensoftph.com/how-to-connect-to-an-api-using-javafx/feed/ 0 How to connect to an API using JavaFX | Dog API nonadult
JavaFX SQLite Database CRUD Tutorial | Note Application https://kensoftph.com/javafx-sqlite-database-crud-tutorial-application/ https://kensoftph.com/javafx-sqlite-database-crud-tutorial-application/#respond Sun, 26 May 2024 12:08:56 +0000 https://kensoftph.com/?p=4015

Explore building a JavaFX note-taking app with an SQLite database, focusing on CRUD operations to manage notes efficiently.

Key Takeaway:

  • Learn to integrate SQLite with JavaFX for a note-taking app.
  • Understand CRUD operations: Create, Read, Update, Delete.
  • Utilize Scene Builder for UI setup.
  • Implement an organized MVC structure with Java.

JavaFX SQLite Database CRUD Tutorial

Hey everyone! I know it’s been a while since my last post. I’ve been away for some time, and unfortunately, my camera decided to break. So, today we’ll dive into a practical tutorial on connecting a SQLite database to a JavaFX application. This project will be a simple note-taking app with CRUD (Create, Read, Update, Delete) functionality. Let’s get started!

Setting Up the Scene Builder

First, let’s discuss setting up the GUI using Scene Builder. For our note-taking app, we’ll have:

  • A SplitPane containing:
  • A ListView on the left to display the list of notes.
  • A TextArea on the right for typing notes.
  • Buttons for:
  • Saving or updating a note.
  • Deleting a note.
  • Clearing the selection from the ListView.

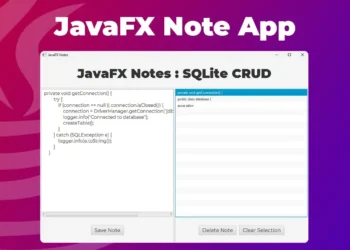
You’ll need to assign proper IDs and event handlers to these components. Here’s a quick visual in Scene Builder:

  1. ListView FXID: listView
  2. TextArea FXID: textArea
  3. Buttons with IDs and corresponding onAction events:
  • Save/Update Button: onAction="btnSave"
  • Delete Button:onAction="btnDelete"
  • Clear Selection Button:onAction="btnClear"

Once the UI is set up, we’ll move to the coding part using IntelliJ IDE.

Adding SQLite Dependency

Firstly, we need to add the SQLite driver dependency in our pom.xml if you are using Maven. Here is how:

        <dependency>
            <groupId>org.xerial</groupId>
            <artifactId>sqlite-jdbc</artifactId>
            <version>3.45.1.0</version>
        </dependency>

Refresh your Maven dependencies to download the required libraries.

Connecting to SQLite Database

We’ll start with establishing a connection to the SQLite database. We’ll create a Db class to manage database operations.

package com.kensoftph.javafxnotes;

import java.sql.*;
import java.util.ArrayList;
import java.util.List;
import java.util.logging.Logger;

public class Db {
    private Connection connection;
    private Logger logger = Logger.getLogger(this.getClass().getName());

    public void getConnection() {
        try {
            if (connection == null || connection.isClosed()) {
                connection = DriverManager.getConnection("jdbc:sqlite:notes.db");
                logger.info("Connected to database");
                createTable();
            }
        } catch (SQLException e) {
            logger.info(e.toString());
        }
    }

    private void createTable() {
        getConnection();
        String query = "create table if not exists note (id integer not null primary key autoincrement, title text not null, content text not null)";
        try (PreparedStatement statement = connection.prepareStatement(query)) {
            statement.executeUpdate();
            logger.info("Table created");
        } catch (SQLException e) {
            logger.info(e.toString());
        }
    }

    private void closeConnection() throws SQLException {
        if (connection != null || !connection.isClosed()) {
            connection.close();
        }
    }
}

In our Db class, we’ve defined methods to get a connection, close the connection, and create a table if it doesn’t exist.

CRUD Operations

Let’s define the CRUD operations in Db.

Insert Note

    public void insertNote(String title, String content) {
        getConnection();
        String query = "insert into note (title, content) values(?, ?)";
        try (PreparedStatement statement = connection.prepareStatement(query)) {
            statement.setString(1, title);
            statement.setString(2, content);
            statement.executeUpdate();
            logger.info("Note inserted");

            closeConnection();
        } catch (SQLException e) {
            logger.info(e.toString());
        }
    }

Read Notes

    public List<Note> readNotes() {
        getConnection();
        String query = "select * from note";
        List<Note> notes = new ArrayList<>();
        try(PreparedStatement statement = connection.prepareStatement(query)){
            ResultSet rs = statement.executeQuery();

            while(rs.next()){
                int id = rs.getInt("id");
                String title = rs.getString("title");
                String content = rs.getString("content");
                notes.add(new Note(id, title, content));
            }

            closeConnection();
        }catch(SQLException e) {
            logger.info(e.toString());
        }

        return notes;
    }

Update Note

    public void updateNote(int id, String title, String content) {
        getConnection();
        String query = "update note set title = ?, content = ? where id = ?";
        try(PreparedStatement statement = connection.prepareStatement(query)){
            statement.setString(1, title);
            statement.setString(2, content);
            statement.setInt(3, id);
            statement.executeUpdate();
            logger.info("Note updated");

            closeConnection();
        }catch (SQLException e){
            logger.info(e.toString());
        }
    }

Delete Note

    public void deleteNote(int id) {
        getConnection();
        String query = "delete from note where id = ?";
        try(PreparedStatement statement = connection.prepareStatement(query)){
            statement.setInt(1, id);
            statement.executeUpdate();
            logger.info("Note deleted");

            closeConnection();
        }catch (SQLException e){
            logger.info(e.toString());
        }
    }

Controller Setup

Next, let’s set up the NotesController class to handle UI interactions and CRUD operations:

package com.kensoftph.javafxnotes;

import javafx.fxml.FXML;
import javafx.fxml.Initializable;
import javafx.scene.control.ListView;
import javafx.scene.control.TextArea;
import javafx.scene.input.MouseEvent;

import java.net.URL;
import java.util.ArrayList;
import java.util.List;
import java.util.ResourceBundle;

public class NotesController implements Initializable {

    private Db db = new Db();

    @FXML
    private ListView<Note> listView;

    @FXML
    private TextArea textArea;

    @FXML
    private void listViewClicked(MouseEvent event) {
        if(listView.getSelectionModel().getSelectedItem() != null) {
            textArea.setText(listView.getSelectionModel().getSelectedItem().getContent());
        }
    }

    @FXML
    void btnClear(MouseEvent event) {
        if (listView.getSelectionModel().getSelectedItem() != null) {
            listView.getSelectionModel().clearSelection();
            textArea.clear();
        }
    }

    @FXML
    void btnDelete(MouseEvent event) {
        if (listView.getSelectionModel().getSelectedItem() != null) {
            db.deleteNote(listView.getSelectionModel().getSelectedItem().getId());
            refreshList();
        }
    }

    @FXML
    void btnSave(MouseEvent event) {

        String fiveWords = textArea.getText();
        String[] words = fiveWords.split("\\s");
        List<String> wordTitle = new ArrayList<>();

        for (int i = 0; i < words.length && i < 5; i++) {
            wordTitle.add(words[i]);
        }

        String title = String.join(" ", wordTitle);


        if(listView.getSelectionModel().getSelectedItem() != null && !textArea.getText().trim().isEmpty() ){
            db.updateNote(listView.getSelectionModel().getSelectedItem().getId(), title, textArea.getText());
            refreshList();
            return;
        }

        if(!textArea.getText().trim().isEmpty()){
            db.insertNote(title, textArea.getText());
            refreshList();
        }

    }

    private void refreshList() {
        List<Note> note = db.readNotes();
        listView.getItems().clear();
        textArea.clear();
        listView.getItems().addAll(note);
    }

    @Override
    public void initialize(URL url, ResourceBundle resourceBundle) {
        refreshList();
    }
}

In our NotesController, we’ve defined methods to handle save, delete, and clear operations. We also implement a click event on the ListView to populate the TextArea with the selected note.

Creating the Note Model

We need a Note class to represent the notes from the database:

package com.kensoftph.javafxnotes;

public class Note {
    private int id;
    private String title;
    private String content;

    public Note (int id, String title, String content) {
        this.id = id;
        this.title = title;
        this.content = content;
    }

    public int getId() {
        return id;
    }

    public String getTitle() {
        return title;
    }

    public String getContent() {
        return content;
    }
}

This class has getter methods to access note attributes to display the note’s title in the ListView.

Running the Application

Now that all the components are in place:

  • Initialize the app by running the JavaFX application.
  • Test inserting a new note.
  • Check if the note appears in the ListView.
  • Update and delete notes to ensure all functionalities work.
JavaFX SQLite Database CRUD Tutorial

Wrapping up

Building a JavaFX application with SQLite database CRUD operations is a good project that showcases how JavaFX and SQLite can be effectively utilized together. It covers basic database operations and provides a simple yet functional note-taking app.

Don’t forget to clear your database connection to avoid memory leaks, especially after every database transaction.

Tips:

  • Use this tutorial to build different applications by altering the data model.
  • Customize your UI to make your application more user-friendly.
  • Experiment with more advanced functionalities like search or filter options.

Finally, I’d love to hear from you! What new features would you add to this note-taking app? Feel free to share your thoughts or ask questions in the comments below.

Happy coding! 😊

How do you set up a JavaFX application with SQLite for note-taking?

To set up a JavaFX note-taking app with SQLite, use Scene Builder for the UI, establish a database connection, and implement CRUD operations in Java to create, read, update, and delete notes efficiently.

]]>
https://kensoftph.com/javafx-sqlite-database-crud-tutorial-application/feed/ 0 JavaFX SQLite Database CRUD Tutorial | JavaFX Notes App nonadult
JavaFX Drag and Drop Tutorial | Perfect For Beginners https://kensoftph.com/javafx-drag-and-drop-tutorial-perfect-for-beginners/ https://kensoftph.com/javafx-drag-and-drop-tutorial-perfect-for-beginners/#respond Sat, 14 Oct 2023 13:46:30 +0000 https://kensoftph.com/?p=3947 If you are a beginner to JavaFX or an experienced programmer looking to add some drag and drop functionality to your GUI applications, you’ve landed on the right page. In this tutorial, we will talk about JavaFX drag and drop and specifically, about javafx drag and drop image and if you want to learn more about drag and drop, you can go to this documentation to learn more.

Understanding JavaFX

JavaFX is a powerful tool used to create and deliver desktop applications, along with rich interactive JavaFX Controls such as Button, Label, TreeView, TableView and more. One of the many standout features that JavaFX offers is its built-in support for drag and drop, enabling users to move data in a graphical way.

JavaFX Drag and Drop Basics

To implement the drag and drop feature in a JavaFX application, you need to manage a series of events. An essential point to remember is that the drag and drop operation in JavaFX comprises three stages of Drag Events such as ‘drag detected‘, ‘drag over‘, and ‘drag dropped‘.

  • Drag Detected: This event indicates the initiation of a drag and drop gesture. Here, we define what we are transferring with our drag operation via a Dragboard.
  • Drag Over: Takes place when the mouse moves over a node during the drag and drop gesture. Here, the program decides whether to accept or reject the drag operation based on the type of data being transferred.
  • Drag Dropped: Happens when the user releases the mouse button, i.e., drops the item. It defines how to handle the event of dropping the data.

But in this tutorial, I will only use the Drag Over and Drag Dropped to perform the action.

Implementing Drag and Drop Image in JavaFX

A practical application of JavaFX drag and drop is moving images within the application. Here’s a simple way to do that:

First, ensure you have an ImageView defined in your JavaFX application. We handle drag and drop events for this ImageView. You can use SceneBuilder to achieve this in an easier way.

Code

    @FXML
    private ImageView imageView;

    @FXML
    void imageViewDragDropped(DragEvent event) {
        Dragboard dragboard = event.getDragboard();
        if(dragboard.hasImage() || dragboard.hasFiles()){
            try {
                imageView.setImage(new Image(new FileInputStream(dragboard.getFiles().get(0))));
            } catch (FileNotFoundException e) {
                throw new RuntimeException(e);
            }
        }
        event.consume();
    }

    @FXML
    void imageViewDragOver(DragEvent event) {
        Dragboard dragboard = event.getDragboard();
        if(dragboard.hasImage() || dragboard.hasFiles()){
            event.acceptTransferModes(TransferMode.COPY);
        }

        event.consume();
    }

Output

JavaFX Drag and Drop Image

In this code, in imageViewDragDropped we check if the Dragboard has an image. If it does, we set that image to the ImageView. In imageViewDragOver, we check the same condition and if true, we accept the transfer modes.

Remember to call event.consume().It is used to stop the further propagation of the event to parent nodes – effectively saying “This event has been handled”.

Why Implement JavaFX Drag and Drop?

Besides offering an intuitive interaction mode, the drag and drop API in JavaFX keeps your code neat and structured as you are coding according to a set of predefined events. It provides an engaging user experience, contributing to the overall UI of your application.

In summary, whether you’re developing a simple or complex GUI application, incorporating javafx drag and drop can significantly enhance your application’s UX. JavaFX’s simplicity, robustness, and flexibility make it an ideal technology for building modern Java applications. Whether it’s JavaFX drag and drop image or other features, JavaFX brings a lot of benefits to the table.

JavaFX’s drag and drop is straightforward to understand, even for beginners. By following this tutorial, you should be well on your way to creating interactive JavaFX applications.

Remember, practical implementation is key to mastering any concept. So, try out this code snippet to familiarize yourself with the process. Explore more functionalities that javafx drag and drop offers, and discover how you can make your applications more interactive. Happy coding!

YouTube Video

]]>
https://kensoftph.com/javafx-drag-and-drop-tutorial-perfect-for-beginners/feed/ 0 Java - Kensoft PH nonadult
JavaFX Music Player Tutorial with JavaFX Media Player https://kensoftph.com/javafx-music-player-with-javafx-media-player/ https://kensoftph.com/javafx-music-player-with-javafx-media-player/#respond Thu, 05 Oct 2023 08:13:57 +0000 https://kensoftph.com/?p=3928 In the field of software development, creating a cool and user-engaging Music Player application is a popular use case that developers often come across. This tutorial aims to guide you in developing a basic and simple music player using JavaFX platform. Specifically, it is a basic and fundamental tutorial on how to implement JavaFX Music Player with JavaFX Media Player.

A Sneak Peek of JavaFX Media Player

JavaFX Media Player is a component, specifically class javafx.scene.media.MediaPlayer, designed to take care of media playback in a straightforward manner. It can play a variety of media types but in this walk-through, our focus will be on utilizing the JavaFX Media Player for creating a JavaFX Music Player that can play your favorite tracks.

Dive-In: Developing a basic and simple JavaFX Music Player

So, are you stoked to build and perhaps, get your tunes playing in no time? Let’s dig in!

Screenshot 1

Step1: Equip Yourself: Setting up JavaFX

First thing first, ensure you’re geared up! Have the JavaFX SDK set up on your development environment. Besides, an IDE with support for JavaFX projects, like the IntelliJ IDEA, would be beneficial.

Step 2: Build your Stage: The Interface

Designing the JavaFX Music Player begins with setting up your interface using SceneBuilder. Start off by making a new JavaFX project and open the FXML file in SceneBuilder to create your awesome user interface. Key elements that your interface should contain include functionalities like “Play”, “Pause”, “Next”, “Previous” buttons, perhaps a “Volume” control, and other elements you’d love on a music player.

Step 3: The Backbone: Integrating JavaFX Media Player

After setting up our interface, it’s time to work on the code to bring life into the application. Inside the class that stands as our controller class of our FXML file, we initialize the Media and MediaPlayer objects

But before that, if you’re using the Maven build, you can download another module using the dependency at the pom.xml file and require it at the module-info.java to access the Media Classes.

pom.xml

        <dependency>
            <groupId>org.openjfx</groupId>
            <artifactId>javafx-media</artifactId>
            <version>17.0.6</version>
        </dependency>

module-info.java

module com.kensoftph.mediaplayer {
    requires javafx.controls;
    requires javafx.fxml;
    requires javafx.media;


    opens com.kensoftph.mediaplayer to javafx.fxml;
    exports com.kensoftph.mediaplayer;
}
Media media = new Media(new File("path_to_your_music_file.mp3").toURI().toString());
MediaPlayer mediaPlayer = new MediaPlayer(media);

Remember to import javafx.scene.media.Media and javafx.scene.media.MediaPlayer.

Step 4: Making it Pop: Play, Pause, Next, Previous Functionality

How do we get the buttons doing what they’re supposed to? That’s simple! We implement these functions by adding event handlers for the buttons created in your FXML file.

For example, to make your play and pause functionality work, you could use:

playButton.setOnAction(e -> mediaPlayer.play());

pauseButton.setOnAction(e -> mediaPlayer.pause());

Similarly, you can build functionalities for “Next”, “Previous”, and “Volume” control. It’s as simple as loading the right file into your MediaPlayer object or tweaking the volume property.

Full source code of my basic and simple music player

In this code, I will provide you the source code that was developed with SceneBuilder. You can copy these code here and implement this to your own project.

FXML File
<?xml version="1.0" encoding="UTF-8"?>

<?import javafx.scene.control.Button?>
<?import javafx.scene.control.Label?>
<?import javafx.scene.layout.BorderPane?>
<?import javafx.scene.layout.HBox?>
<?import javafx.scene.layout.VBox?>
<?import javafx.scene.text.Font?>


<BorderPane maxHeight="-Infinity" maxWidth="-Infinity" minHeight="-Infinity" minWidth="-Infinity" prefHeight="342.0" prefWidth="455.0" xmlns="http://javafx.com/javafx/18" xmlns:fx="http://javafx.com/fxml/1" fx:controller="com.kensoftph.mediaplayer.MusicPlayer">
   <center>
      <VBox alignment="CENTER" prefHeight="200.0" prefWidth="100.0" BorderPane.alignment="CENTER">
         <children>
            <Label text="Simple Music Player">
               <font>
                  <Font size="40.0" />
               </font>
            </Label>
            <Label fx:id="chooseMusic" onMouseClicked="#chooseMusic" text="Choose your music">
               <font>
                  <Font size="15.0" />
               </font>
            </Label>
            <HBox alignment="CENTER" prefHeight="56.0" prefWidth="455.0" spacing="10.0">
               <children>
                  <Button mnemonicParsing="false" onMouseClicked="#play" text="Play">
                     <font>
                        <Font size="15.0" />
                     </font>
                  </Button>
                  <Button mnemonicParsing="false" onMouseClicked="#pause" text="Pause">
                     <font>
                        <Font size="15.0" />
                     </font>
                  </Button>
                  <Button mnemonicParsing="false" onMouseClicked="#stop" text="Stop">
                     <font>
                        <Font size="15.0" />
                     </font>
                  </Button>
               </children>
            </HBox>
         </children>
      </VBox>
   </center>
</BorderPane>
FXML Controller Java Class
package com.kensoftph.mediaplayer;

import javafx.fxml.FXML;
import javafx.scene.control.Label;
import javafx.scene.input.MouseEvent;
import javafx.scene.media.Media;
import javafx.scene.media.MediaPlayer;
import javafx.stage.FileChooser;

import java.io.File;

public class MusicPlayer {

    @FXML
    private Label chooseMusic;

    private MediaPlayer mediaPlayer;

    @FXML
    void chooseMusic(MouseEvent event) {
        FileChooser chooser = new FileChooser();
        chooser.setTitle("Select your music");
        File file = chooser.showOpenDialog(null);
        if(file != null){
            String selectedFile = file.toURI().toString();
            Media media = new Media(selectedFile);
            mediaPlayer = new MediaPlayer(media);
            mediaPlayer.setOnReady(() -> chooseMusic.setText(file.getName()));
        }
    }

    @FXML
    void pause(MouseEvent event) {
        mediaPlayer.pause();
    }

    @FXML
    void play(MouseEvent event) {
        mediaPlayer.play();
    }

    @FXML
    void stop(MouseEvent event) {
        mediaPlayer.stop();
    }

}
Main Class
package com.kensoftph.mediaplayer;

import javafx.application.Application;
import javafx.fxml.FXMLLoader;
import javafx.scene.Scene;
import javafx.stage.Stage;

import java.io.IOException;

public class Main extends Application {
    @Override
    public void start(Stage stage) throws IOException {
        FXMLLoader fxmlLoader = new FXMLLoader(Main.class.getResource("music-player.fxml"));
        Scene scene = new Scene(fxmlLoader.load());
        stage.setTitle("JavaFX Music Player");
        stage.setScene(scene);
        stage.show();
    }

    public static void main(String[] args) {
        launch();
    }
}
JavaFX Media Player

Step 5: Finishing and Testing

Now that all functionalities are implemented, go ahead and run your JavaFX application. What do you see? An interactive JavaFX Music Player by you, for you!

The Bottom-line

Truly, you can now share in the pride of having the foundational knowledge to implement a JavaFX Music Player. JavaFX makes it easy to do so much, creating music players with smooth user interfaces and easy media file handling skillfully. Always remember to write your code in a form other developers can understand and maintain easily. This way, your JavaFX Music Player can be efficient, scalable and a joy to interact with. Until next time, happy coding!

Youtube Video

]]>
https://kensoftph.com/javafx-music-player-with-javafx-media-player/feed/ 0 JavaFX Music Player Tutorial | Learn how to create this in JavaFX! nonadult
How to Play Video in JavaFX MediaPlayer from a File https://kensoftph.com/how-to-play-video-in-javafx-mediaplayer-from-a-file/ https://kensoftph.com/how-to-play-video-in-javafx-mediaplayer-from-a-file/#respond Mon, 25 Sep 2023 03:35:30 +0000 https://kensoftph.com/?p=3912 JavaFX is a powerful framework for creating rich and interactive user interfaces in Java applications. One of the powerful features is the JavaFX MediaPlayer, which allows you to play multimedia content such as video and audio into your JavaFX applications. In this JavaFX MediaPlayer tutorial, we’re going to learn how to play a video in JavaFX MediaPlayer from a file. If you’re building a media player application or you just simply want to integrate a video playback into your JavaFX application project. Well, then this guide will walk you through the basic coding to start developing a very simple media player into your application using JavaFX.

What is JavaFX Media Player?

Before we dive into the JavaFX MediaPlayer code. The MediaPlayer class provides us with controlling for playing media files such as video and audio. Without the Media Class, we can’t play a video. The media class is also an important class to handle the media file to display in the MediaPlayer and so with the MediaView.

The MediaView is used to show visuals for the MediaPlayer class. So, all of the three classes will be used in developing the basic and simple media player in JavaFX application.

Since we have the full control with the Media player class, we can absolutely Play, Pause, Stop, Seek, AutoPlay, Mute and even adjust the Volume. So now, let’s continue on creating our project or simply implement this into your existing project.

Make sure to create a new JavaFX project or open an existing one in your favorite integrated development environment (IDE).

Importing the Required Packages

Please don’t forget to use the required module to work with the Media class in JavaFX if you’re using the Maven build. You need to import the necessary packages into your Java class. Include the following imports at the beginning of your Java file:

import javafx.application.Application;
import javafx.fxml.FXMLLoader;
import javafx.scene.Scene;
import javafx.stage.Stage;

These packages provide the essential classes and components for playing video using JavaFX.

If you encounter problems during importing the packages if you’re using Maven. Make sure to download a dependency in your pom.xml file. Head over to the given dependency code below to learn more.

<dependencies>
        <dependency>
            <groupId>org.openjfx</groupId>
            <artifactId>javafx-controls</artifactId>
            <version>17.0.6</version>
        </dependency>
        <dependency>
            <groupId>org.openjfx</groupId>
            <artifactId>javafx-fxml</artifactId>
            <version>17.0.6</version>
        </dependency>
        <dependency>
            <groupId>org.openjfx</groupId>
            <artifactId>javafx-media</artifactId>
            <version>17.0.6</version>
        </dependency>
</dependencies>

After adding the dependencies, you also must require the modules at the module-info.java. Here’s the code.

module com.kensoftph.javafxmedia {
    requires javafx.controls;
    requires javafx.fxml;
    requires javafx.media;


    opens com.kensoftph.javafxmedia to javafx.fxml;
    exports com.kensoftph.javafxmedia;
}

Creating the JavaFX MediaPlayer

We have other ways to create an application in JavaFX but in this tutorial, I am using the SceneBuilder to create this basic and simple JavaFX MediaPlayer Application. Now, to create the GUI is very simple using the SceneBuilder. You just have to drag and drop the components like buttons, labels, layouts or the JavaFX controls to be general. The example FXML code is the FXML file of the GUI came from the SceneBuilder. Head over to the code below to learn more and you can also copy that code to your example project and see how it works.

FXML File

<?xml version="1.0" encoding="UTF-8"?>

<?import javafx.geometry.Insets?>
<?import javafx.scene.control.Button?>
<?import javafx.scene.control.Label?>
<?import javafx.scene.control.Slider?>
<?import javafx.scene.layout.BorderPane?>
<?import javafx.scene.layout.HBox?>
<?import javafx.scene.layout.VBox?>
<?import javafx.scene.media.MediaView?>


<BorderPane maxHeight="-Infinity" maxWidth="-Infinity" minHeight="-Infinity" minWidth="-Infinity" prefHeight="600.0" prefWidth="850.0" xmlns="http://javafx.com/javafx/18" xmlns:fx="http://javafx.com/fxml/1" fx:controller="com.kensoftph.javafxmedia.MediaPlayerController">
   <center>
      <MediaView fx:id="mediaView" fitHeight="200.0" fitWidth="200.0" BorderPane.alignment="BOTTOM_CENTER" />
   </center>
   <bottom>
      <VBox prefHeight="120.0" prefWidth="850.0" BorderPane.alignment="CENTER">
         <children>
            <HBox alignment="CENTER" prefHeight="43.0" prefWidth="850.0">
               <children>
                  <Slider fx:id="slider" onMousePressed="#sliderPressed" HBox.hgrow="ALWAYS" />
               </children>
               <padding>
                  <Insets left="15.0" right="15.0" />
               </padding>
            </HBox>
            <HBox alignment="CENTER" prefHeight="100.0" prefWidth="200.0" spacing="10.0">
               <children>
                  <Button mnemonicParsing="false" onAction="#selectMedia" text="Select Media" />
                  <Button fx:id="btnPlay" mnemonicParsing="false" onMouseClicked="#btnPlay" text="Play" />
                  <Button mnemonicParsing="false" onMouseClicked="#btnStop" text="Stop" />
                  <Label fx:id="lblDuration" text="Duration: 00 / 00" />
               </children>
            </HBox>
         </children>
      </VBox>
   </bottom>
</BorderPane>
JavaFX Media

FXML Controller

The following code will be the controller class for the FXML code.

import javafx.event.ActionEvent;
import javafx.fxml.FXML;
import javafx.scene.Scene;
import javafx.scene.control.Button;
import javafx.scene.control.Label;
import javafx.scene.control.Slider;
import javafx.scene.input.MouseEvent;
import javafx.scene.media.Media;
import javafx.scene.media.MediaPlayer;
import javafx.scene.media.MediaView;
import javafx.stage.FileChooser;
import javafx.util.Duration;

import java.io.File;

public class MediaPlayerController {

    @FXML
    private Button btnPlay;

    @FXML
    private Label lblDuration;

    @FXML
    private MediaView mediaView;
    @FXML
    private Slider slider;

    private Media media;
    private MediaPlayer mediaPlayer;

    private boolean isPlayed = false;

    @FXML
    void btnPlay(MouseEvent event) {
        if(!isPlayed){
            btnPlay.setText("Pause");
            mediaPlayer.play();
            isPlayed = true;
        }else {
            btnPlay.setText("Play");
            mediaPlayer.pause();
            isPlayed = false;
        }
    }

    @FXML
    void btnStop(MouseEvent event) {
        btnPlay.setText("Play");
        mediaPlayer.stop();
        isPlayed = false;
    }

    @FXML
    void selectMedia(ActionEvent event) {

        FileChooser fileChooser = new FileChooser();
        fileChooser.setTitle("Select Media");
        File selectedFile = fileChooser.showOpenDialog(null);

        if(selectedFile != null){
            String url = selectedFile.toURI().toString();

            media = new Media(url);
            mediaPlayer = new MediaPlayer(media);

            mediaView.setMediaPlayer(mediaPlayer);

            mediaPlayer.currentTimeProperty().addListener(((observableValue, oldValue, newValue) -> {
                slider.setValue(newValue.toSeconds());
                lblDuration.setText("Duration: " + (int)slider.getValue() + " / " + (int)media.getDuration().toSeconds());
            }));

            mediaPlayer.setOnReady(() ->{
                Duration totalDuration = media.getDuration();
                slider.setMax(totalDuration.toSeconds());
                lblDuration.setText("Duration: 00 / " + (int)media.getDuration().toSeconds());
            });

            Scene scene = mediaView.getScene();
            mediaView.fitWidthProperty().bind(scene.widthProperty());
            mediaView.fitHeightProperty().bind(scene.heightProperty());

            //mediaPlayer.setAutoPlay(true);

        }

    }

    @FXML
    private void sliderPressed(MouseEvent event){
        mediaPlayer.seek(Duration.seconds(slider.getValue()));
    }

}

Main class

import javafx.application.Application;
import javafx.fxml.FXMLLoader;
import javafx.scene.Scene;
import javafx.stage.Stage;

import java.io.IOException;

public class Main extends Application {
    @Override
    public void start(Stage stage) throws IOException {
        FXMLLoader fxmlLoader = new FXMLLoader(Main.class.getResource("media-player.fxml"));
        Scene scene = new Scene(fxmlLoader.load());
        stage.setTitle("JavaFX MediaPlayer!");
        stage.setScene(scene);
        stage.show();
    }

    public static void main(String[] args) {
        launch();
    }
}

Example Output

JavaFX MediaPlayer

Youtube Video

]]>
https://kensoftph.com/how-to-play-video-in-javafx-mediaplayer-from-a-file/feed/ 0 JavaFX Media Player Tutorial | 100% For Beginners nonadult
How to use the TreeView in JavaFX | 100% Perfect Tutorial https://kensoftph.com/how-to-use-the-treeview-in-javafx-perfect-tutorial/ https://kensoftph.com/how-to-use-the-treeview-in-javafx-perfect-tutorial/#respond Sat, 29 Jul 2023 10:12:12 +0000 https://kensoftph.com/?p=3863 How to use the TreeView in JavaFX

What’s up! In this tutorial, you will learn how to use the TreeView in JavaFX. The TreeView is a useful and powerful control to use in JavaFX. This control allows us and the users to display hierarchical data. JavaFX TreeView has collapsible and expandable features which will be a good feature to help the user interface to be organized.

When you would like to expand the TreeView, you will first need to expand the parent or the root node, child or branch node and last the last data will be the leaf node. When all TreeItems are expanded, it provides a visual representation of a tree structure. If you are not familiar with the TreeItem, JavaFX TreeItem is used to create the nodes like the root or parent node until the leaf node.

Create the TreeView

Let’s get started and learn more about the TreeView and let’s start by creating the JavaFX TreeView. In this example, I will provide you with the code to create the TreeView, the provided code snippet below will guide you in creating it. You’ll need to use the TreeView class and we’ll use String as its generic type as shown in the code below.

TreeView<String> treeView = new TreeView<>();

Now, we’ve created the TreeView in JavaFX but we’re not done yet. The TreeView is also a parameterized constructor, just like the other nodes. You can also assign a node or the root node there. You can set the root node as well like treeView.setRoot(treeItem); We also need to create the TreeItem. A TreeView without a TreeItem is useless, so we must create this node. TreeItem is a piece of data in the tree which represents the parent, branch or the leaf node. Now, please see the code as shown below to see how it works.

TreeItem<String> root = new TreeItem<>("Root");

TreeItem<String> branch1 = new TreeItem<>("Branch 1");
TreeItem<String> branch2 = new TreeItem<>("Branch 2");

TreeItem<String> leaf1 = new TreeItem<>("leaf 1");
TreeItem<String> leaf2 = new TreeItem<>("leaf 2");
TreeItem<String> leaf3 = new TreeItem<>("leaf 3");
TreeItem<String> leaf4 = new TreeItem<>("leaf 4");

root.getChildren().addAll(branch1, branch2);
branch1.getChildren().addAll(leaf1, leaf2);
branch2.getChildren().addlAll(leaf3, leaf4);

Displaying TreeView

In this part of this basic tutorial, you will learn how to display the TreeView in the application window or the JavaFX Stage. You also need to learn more about layout in JavaFX to create the layout for the scene. If you already know how to display the nodes to the stage, this will be easy for you. The following code as shown below will show you how to display the TreeView in JavaFX with a scene on the Stage.

VBox layout = new VBox(treeView);
Scene scene = new Scene(layout, 400, 400);
stage.setScene(scene);
stage.setTitle("JavaFX TreeView");
stage.show();

Example 1: Put the code all together

In this example, we will put the codes together as we’ve learned the basic example of creating the TreeView in JavaFX.

import javafx.application.Application;
import javafx.scene.Scene;
import javafx.scene.control.TreeItem;
import javafx.scene.control.TreeView;
import javafx.scene.layout.VBox;
import javafx.stage.Stage;

import java.io.IOException;

public class TreeViewMain extends Application {
    @Override
    public void start(Stage stage) throws IOException {

        TreeItem<String> root = new TreeItem<>("Root");

        TreeView<String> treeView = new TreeView<>(root);
        treeView.setShowRoot(true);

        TreeItem<String> branch1 = new TreeItem<>("Branch 1");
        TreeItem<String> branch2 = new TreeItem<>("Branch 2");

        TreeItem<String> leaf1 = new TreeItem<>("leaf 1");
        TreeItem<String> leaf2 = new TreeItem<>("leaf 2");
        TreeItem<String> leaf3 = new TreeItem<>("leaf 3");
        TreeItem<String> leaf4 = new TreeItem<>("leaf 4");

        root.getChildren().addAll(branch1, branch2);
        branch1.getChildren().addAll(leaf1, leaf2);
        branch2.getChildren().addAll(leaf3, leaf4);

        VBox layout = new VBox(treeView);
        Scene scene = new Scene(layout, 400, 400);
        stage.setScene(scene);
        stage.setTitle("JavaFX TreeView");
        stage.show();

    }

    public static void main(String[] args) {
        launch();
    }
}

Output

TreeView in JavaFX

Example 2: Advance JavaFX TreeView

In this example, I will provide an advanced example code for creating the JavaFX TreeView. The code will execute dynamically from a selected path on your computer and it will automatically generate TreeItems based on the files from the selected path. To learn more about it, please proceed to the given code below.

import javafx.application.Application;
import javafx.scene.Scene;
import javafx.scene.control.TreeItem;
import javafx.scene.control.TreeView;
import javafx.scene.layout.VBox;
import javafx.stage.Stage;

import java.io.File;
import java.io.IOException;

public class TreeViewMain extends Application {
    @Override
    public void start(Stage stage) throws IOException {

        File filePath = new File("D:\\IDEA Projects"); // you can change the path here to your desired path
        
        // Create the root and items
        TreeItem<String> root = createItems(filePath);

        // create the treeview
        TreeView<String> treeView = new TreeView<>(root);

        // Create the Scene and show the stage
        VBox layout = new VBox(treeView);
        Scene scene = new Scene(layout, 400, 400);
        stage.setScene(scene);
        stage.setTitle("JavaFX TreeView");
        stage.show();

        // This code will print out the selected items on the TreeView
        treeView.getSelectionModel().selectedItemProperty().addListener((observable, oldValue, newValue ) ->{
            String selectedItem = newValue.getValue();
            System.out.println(selectedItem);
        });
    }

    // create the treeitems dynamically based on the given path
    private TreeItem<String> createItems(File file){
        TreeItem<String> treeItems = new TreeItem<>(file.getName());
        if(file.isDirectory()){
            File[] files = file.listFiles();
            if(files != null){
                for(File childItem : files){
                    treeItems.getChildren().addAll(createItems(childItem));
                }
            }
        }

        return treeItems;
    }

    public static void main(String[] args) {
        launch();
    }
}

Output

JavaFX TreeView

YouTube Video

]]>
https://kensoftph.com/how-to-use-the-treeview-in-javafx-perfect-tutorial/feed/ 0 How to use the TreeView in JavaFX | 100% Perfect for Beginners nonadult
How to use the Table View in JavaFX | 100% Perfect Tutorial https://kensoftph.com/how-to-use-the-table-view-in-javafx-perfect-tutorial/ https://kensoftph.com/how-to-use-the-table-view-in-javafx-perfect-tutorial/#respond Sat, 17 Jun 2023 08:54:25 +0000 https://kensoftph.com/?p=3806 One of the greatest and most useful control in JavaFX is TableView. Table View in JavaFX is used to display and edit data in a tabular form. In this tutorial, I will show you the process of creating and using the JavaFX TableView and by the end of this tutorial, you learn how to use the Table View in JavaFX and create a simple application that will allow the user to insert, edit and remove data from the TableView.

JavaFX Table View is similar to Google Sheets or Microsoft Excel which displays data in rows and columns. The table view in JavaFX consists of three main parts which are the table itself which is the container of the table columns and data. The other part is the table column, which defines the column of data that is displayed, edited or removed.

How to use the Table View in JavaFX

Alright, to create and implement this control in our JavaFX application, you need to create a table view object using the TableView class. After you’ve created the TableView, you’ll need to add it to the SceneGraph to make it visible in our application. But tableview itself isn’t enough to make our table work out, so we also need to create the TableColumn and add it to our table view.

Okay, let’s dive into creating the table in our JavaFX program. In the following example, we’ll use the TableView class to create a TableView control. The example code given below will create a table view that will use objects of the Person class as its items. As you’ve read about Person class, you need to create another class called Person.

Let’s get started! Please take a look at the given code below to see how to create a Table View in JavaFX without using the FXML file and the controller Class. Later in this example, I will also show you how to create the table view with FXML or you can watch my YouTube video below.

import javafx.application.Application;
import javafx.scene.Scene;
import javafx.scene.control.TableView;
import javafx.scene.layout.StackPane;
import javafx.stage.Stage;

import java.io.IOException;

public class Main extends Application {
    @Override
    public void start(Stage stage) {

        TableView<Person> tableView = new TableView<>(Person.getInitialList());
        tableView.getColumns().addAll(Person.getFistNameCol(), Person.getLastNameCol(), Person.getOriginCol());
        tableView.setColumnResizePolicy(TableView.CONSTRAINED_RESIZE_POLICY);

        StackPane layout = new StackPane(tableView);

        Scene scene = new Scene(layout, 400, 400);
        stage.setScene(scene);
        stage.setTitle("TableView in JavaFX");

        stage.show();
    }

    public static void main(String[] args) {
        launch();
    }
}

The following code below will be the person class that is used in the main class. Make sure to create a new class named Person and copy the code below.

import javafx.collections.FXCollections;
import javafx.collections.ObservableList;
import javafx.scene.control.TableColumn;
import javafx.scene.control.cell.PropertyValueFactory;

public class Person {
    private String firstName;
    private String lastName;
    private String origin;

    public String getFirstName() {
        return firstName;
    }

    public void setFirstName(String firstName) {
        this.firstName = firstName;
    }

    public void setLastName(String lastName) {
        this.lastName = lastName;
    }

    public void setOrigin(String origin) {
        this.origin = origin;
    }

    public String getLastName() {
        return lastName;
    }

    public String getOrigin() {
        return origin;
    }

    public static ObservableList<Person> getInitialList() {
        Person p1 = new Person("Chris", "James", "US");
        Person p2 = new Person("James", "Brown", "US");
        Person p3 = new Person("Jake", "Buck", "US");
        Person p4 = new Person("Blake", "David", "US");
        return FXCollections.observableArrayList(p1, p2, p3, p4);
    }

    public static TableColumn<Person, String> getFistNameCol(){
        TableColumn<Person, String> fNameCol = new TableColumn<>("First Name");
        fNameCol.setCellValueFactory(new PropertyValueFactory<>("firstName"));
        return fNameCol;
    }

    public static TableColumn<Person, String> getLastNameCol(){
        TableColumn<Person, String> lNameCol = new TableColumn<>("Last Name");
        lNameCol.setCellValueFactory(new PropertyValueFactory<>("lastName"));
        return lNameCol;
    }

    public static TableColumn<Person, String> getOriginCol(){
        TableColumn<Person, String> originCol = new TableColumn<>("Origin");
        originCol.setCellValueFactory(new PropertyValueFactory<>("origin"));
        return originCol;
    }

    public Person(String firstName, String lastName, String origin) {
        this.firstName = firstName;
        this.lastName = lastName;
        this.origin = origin;
    }
}

The output of this code will be showing the table view in JavaFX and displays four dummy person names from the Person class.

Table View in JavaFX

Alright, as you can see in the code from the Person class, there are methods called getFirsNameCol(), getLastNameCol() and getOriginCol(). These methods are used to create the TableColumn if you wondered how to create the table column in this way of creating the table view in JavaFX. Okay let’s take one of the TableColumn methods to explain how it works.

  1. In this line of code public static TableColumn<Person, String> getOriginCol() declares a getOriginCol() method that returns the Table Column and has two parameters indicating the Person class and String which is used for displaying string type data and is associated with the Person class.
  2. This line of code TableColumn<Person, String> originCol = new TableColumn<>("Origin"); creates a new TableColumn object named originCol and the TableColumn constructor takes the string which is “Origin” that represents the table column header text or the title of the table column.
  3. This code is responsible for retrieving the the data to show or display in the table column cell. originCol.setCellValueFactory(new PropertyValueFactory<>("origin"));
  4. and the return originCol; returns the originCol object as the result of its method which is getOriginCol();

The following lines of code are to display the data in our Table View in JavaFX, you’ll need to create the Table View in your main class. You can take a look at the given code below. The code will create the TableView and add the TableColumn objects from the Person class.

TableView<Person> tableView = new TableView<>(Person.getInitialList());
tableView.getColumns().addAll(Person.getFistNameCol(), Person.getLastNameCol(), Person.getOriginCol());

How to insert new data into Table View in JavaFX

In this example of our Table view in JavaFX, you will learn how to insert new data and we’ll assume that we have a JavaFX Button handling this block of code below. We will still use the Person class for the data. Please proceed to the following code below to see how it works.

Person newData = new Person(txtFName.getText(), txtLName.getText(), txtOrigin.getText());
table.getItems().add(newData);

How to edit data from the TableView in JavaFX

You already know how to add new data in the JavaFX TableView and next basic part that you need to know is by editing the data by selecting it directly from the Table View in JavaFX. I’m going to put the edit code in a method and you need to call this method inside the initialize() method. Don’t forget to make the Table View in JavaFX editable to true. tableView.setEditable(true);

private void editData(){
    firstName.setCellFactory(TextFieldTableCell.<Person>forTableColumn());
    firstName.setOnEditCommit(event ->{
        Person person = event.getTableView().getItems().get(event.getTablePosition().getRow());
        person.setFirstName(event.getNewValue());
        System.out.println(person.getLastName() + "'s Name was updated to "+ event.getNewValue() +" at row "+ (event.getTablePosition().getRow() + 1));
    });

    lastName.setCellFactory(TextFieldTableCell.<Person>forTableColumn());
    lastName.setOnEditCommit(event ->{
        Person person = event.getTableView().getItems().get(event.getTablePosition().getRow());
        person.setLastName(event.getNewValue());
        System.out.println(person.getFirstName() + "'s Last Name was updated to "+ event.getNewValue() +" at row "+ (event.getTablePosition().getRow() + 1));
    });

    origin.setCellFactory(TextFieldTableCell.<Person>forTableColumn());
    origin.setOnEditCommit(event ->{
        Person person = event.getTableView().getItems().get(event.getTablePosition().getRow());
        person.setOrigin(event.getNewValue());
        System.out.println("Origin was updated to "+ event.getNewValue() +" at row "+ (event.getTablePosition().getRow() + 1));
    });
}

Output

Table View In JavaFX

How to delete data from JavaFX TableView

Let’s proceed to deleting data into table view in JavaFX since you already know how to add and edit data in TableView. Let’s assume that these lines of code below are handled by a button.

    TableView.TableViewSelectionModel<Person> selectionModel = table.getSelectionModel();
    if(selectionModel.isEmpty()){
        System.out.println("You need select a data before deleting.");
    }

    ObservableList<Integer> list = selectionModel.getSelectedIndices();
    Integer[] selectedIndices = new Integer[list.size()];
    selectedIndices = list.toArray(selectedIndices);

    Arrays.sort(selectedIndices);

    for(int i = selectedIndices.length - 1; i >= 0; i--){
        selectionModel.clearSelection(selectedIndices[i].intValue());
        table.getItems().remove(selectedIndices[i].intValue());
    }

How to use the Table View in JavaFX with FXML

In this example, I’ll provide with you the code for creating the table view in JavaFX with FXML file. You can also watch my Youtube video below to see how it works. The first code snippet will be the Main class and to be followed by the Person.java, the fxml file and its controller class.

Main.java

import javafx.application.Application;
import javafx.fxml.FXMLLoader;
import javafx.scene.Scene;
import javafx.scene.control.TableView;
import javafx.scene.layout.StackPane;
import javafx.stage.Stage;

import java.io.IOException;

public class Main extends Application {
    @Override
    public void start(Stage stage) throws IOException {
        FXMLLoader loader = new FXMLLoader(getClass().getResource("table-view.fxml"));
        Scene scene = new Scene(loader.load());
        stage.setTitle("JavaFX TableView");
        stage.setScene(scene);


        // these lines of code here will be creating the tableview without using an FXML file
        /*TableView<Person> tableView = new TableView<>(Person.getInitialList());
        tableView.getColumns().addAll(Person.getFistNameCol(), Person.getLastNameCol(), Person.getOriginCol());
        tableView.setColumnResizePolicy(TableView.CONSTRAINED_RESIZE_POLICY);

        StackPane layout = new StackPane(tableView);

        Scene scene = new Scene(layout, 400, 400);
        stage.setScene(scene);
        stage.setTitle("TableView in JavaFX");*/
        // end

        stage.show();
    }

    public static void main(String[] args) {
        launch();
    }
}

Person.java

import javafx.collections.FXCollections;
import javafx.collections.ObservableList;
import javafx.scene.control.TableColumn;
import javafx.scene.control.cell.PropertyValueFactory;

public class Person {
    private String firstName;
    private String lastName;
    private String origin;

    public String getFirstName() {
        return firstName;
    }

    public void setFirstName(String firstName) {
        this.firstName = firstName;
    }

    public void setLastName(String lastName) {
        this.lastName = lastName;
    }

    public void setOrigin(String origin) {
        this.origin = origin;
    }

    public String getLastName() {
        return lastName;
    }

    public String getOrigin() {
        return origin;
    }

    // this code is for retrieving any data without using the FXML
    public static ObservableList<Person> getInitialList() {
        Person p1 = new Person("Chris", "James", "US");
        Person p2 = new Person("James", "Brown", "US");
        Person p3 = new Person("Jake", "Buck", "US");
        Person p4 = new Person("Blake", "David", "US");
        return FXCollections.observableArrayList(p1, p2, p3, p4);
    }

    public static TableColumn<Person, String> getFistNameCol(){
        TableColumn<Person, String> fNameCol = new TableColumn<>("First Name");
        fNameCol.setCellValueFactory(new PropertyValueFactory<>("firstName"));
        return fNameCol;
    }

    public static TableColumn<Person, String> getLastNameCol(){
        TableColumn<Person, String> lNameCol = new TableColumn<>("Last Name");
        lNameCol.setCellValueFactory(new PropertyValueFactory<>("lastName"));
        return lNameCol;
    }

    public static TableColumn<Person, String> getOriginCol(){
        TableColumn<Person, String> originCol = new TableColumn<>("Origin");
        originCol.setCellValueFactory(new PropertyValueFactory<>("origin"));
        return originCol;
    }

    // end of the code without using an FXML file

    public Person(String firstName, String lastName, String origin) {
        this.firstName = firstName;
        this.lastName = lastName;
        this.origin = origin;
    }
}

table-view.fxml

<?xml version="1.0" encoding="UTF-8"?>

<?import javafx.geometry.Insets?>
<?import javafx.scene.control.Button?>
<?import javafx.scene.control.TableColumn?>
<?import javafx.scene.control.TableView?>
<?import javafx.scene.control.TextField?>
<?import javafx.scene.layout.BorderPane?>
<?import javafx.scene.layout.HBox?>
<?import javafx.scene.layout.VBox?>

<BorderPane maxHeight="-Infinity" maxWidth="-Infinity" minHeight="-Infinity" minWidth="-Infinity" prefHeight="474.0" prefWidth="617.0" xmlns="http://javafx.com/javafx/18" xmlns:fx="http://javafx.com/fxml/1" fx:controller="com.kensoftph.tableview.TableViewController">
   <center>
      <TableView fx:id="table" editable="true" prefHeight="200.0" prefWidth="200.0" BorderPane.alignment="CENTER">
        <columns>
          <TableColumn fx:id="firstName" prefWidth="75.0" text="First name" />
          <TableColumn fx:id="lastName" prefWidth="75.0" text="Last name" />
            <TableColumn fx:id="origin" prefWidth="75.0" text="Origin" />
        </columns>
         <columnResizePolicy>
            <TableView fx:constant="CONSTRAINED_RESIZE_POLICY" />
         </columnResizePolicy>
      </TableView>
   </center>
   <top>
      <VBox alignment="CENTER" prefHeight="96.0" prefWidth="617.0" BorderPane.alignment="CENTER">
         <children>
            <HBox alignment="CENTER" prefHeight="100.0" prefWidth="200.0" spacing="10.0">
               <children>
                  <TextField fx:id="txtFName" promptText="First name" />
                  <TextField fx:id="txtLName" promptText="Last name" />
                  <TextField fx:id="txtOrigin" promptText="Origin" />
               </children>
            </HBox>
            <HBox alignment="CENTER" prefHeight="100.0" prefWidth="200.0" spacing="5.0">
               <children>
                  <Button mnemonicParsing="false" onAction="#btnInsert" text="Insert Data" />
                  <Button mnemonicParsing="false" onAction="#deleteData" text="Delete Data" />
               </children>
            </HBox>
         </children>
         <padding>
            <Insets bottom="15.0" />
         </padding>
      </VBox>
   </top>
</BorderPane>

TableViewController.java

import javafx.collections.FXCollections;
import javafx.collections.ObservableList;
import javafx.event.ActionEvent;
import javafx.fxml.FXML;
import javafx.fxml.Initializable;
import javafx.scene.control.TableColumn;
import javafx.scene.control.TableView;
import javafx.scene.control.TextField;
import javafx.scene.control.cell.PropertyValueFactory;
import javafx.scene.control.cell.TextFieldTableCell;

import java.net.URL;
import java.util.Arrays;
import java.util.ResourceBundle;

public class TableViewController implements Initializable {

    @FXML
    private TableColumn<Person, String> firstName;

    @FXML
    private TableColumn<Person, String> lastName;

    @FXML
    private TableColumn<Person, String> origin;

    @FXML
    private TableView<Person> table;

    @FXML
    private TextField txtFName;

    @FXML
    private TextField txtLName;

    @FXML
    private TextField txtOrigin;

    ObservableList<Person> initialData(){
        Person p1 = new Person("Sample","Last Sample Name"," US");
        Person p2 = new Person("Test","Last Name"," PH");
        return FXCollections.observableArrayList(p1, p2);
    }

    @FXML
    private void btnInsert(ActionEvent event){

        if(!txtFName.getText().isEmpty() || !txtLName.getText().isEmpty() || !txtOrigin.getText().isEmpty()){
            Person newData = new Person(txtFName.getText(), txtLName.getText(), txtOrigin.getText());
            table.getItems().add(newData);
            txtFName.clear();
            txtLName.clear();
            txtOrigin.clear();
        }else{
            System.out.println("Fields should not be empty.");
        }
    }

    @FXML
    private void deleteData(ActionEvent event){
        TableView.TableViewSelectionModel<Person> selectionModel = table.getSelectionModel();
        if(selectionModel.isEmpty()){
            System.out.println("You need select a data before deleting.");
        }

        ObservableList<Integer> list = selectionModel.getSelectedIndices();
        Integer[] selectedIndices = new Integer[list.size()];
        selectedIndices = list.toArray(selectedIndices);

        Arrays.sort(selectedIndices);

        for(int i = selectedIndices.length - 1; i >= 0; i--){
            selectionModel.clearSelection(selectedIndices[i].intValue());
            table.getItems().remove(selectedIndices[i].intValue());
        }
    }

    @Override
    public void initialize(URL url, ResourceBundle resourceBundle) {
        firstName.setCellValueFactory(new PropertyValueFactory<Person, String>("firstName"));
        lastName.setCellValueFactory(new PropertyValueFactory<Person, String>("lastName"));
        origin.setCellValueFactory(new PropertyValueFactory<Person, String>("origin"));

        table.setItems(initialData());

        editData();
    }

    private void editData(){
        firstName.setCellFactory(TextFieldTableCell.<Person>forTableColumn());
        firstName.setOnEditCommit(event ->{
            Person person = event.getTableView().getItems().get(event.getTablePosition().getRow());
            person.setFirstName(event.getNewValue());
            System.out.println(person.getLastName() + "'s Name was updated to "+ event.getNewValue() +" at row "+ (event.getTablePosition().getRow() + 1));
        });

        lastName.setCellFactory(TextFieldTableCell.<Person>forTableColumn());
        lastName.setOnEditCommit(event ->{
            Person person = event.getTableView().getItems().get(event.getTablePosition().getRow());
            person.setLastName(event.getNewValue());
            System.out.println(person.getFirstName() + "'s Last Name was updated to "+ event.getNewValue() +" at row "+ (event.getTablePosition().getRow() + 1));
        });

        origin.setCellFactory(TextFieldTableCell.<Person>forTableColumn());
        origin.setOnEditCommit(event ->{
            Person person = event.getTableView().getItems().get(event.getTablePosition().getRow());
            person.setOrigin(event.getNewValue());
            System.out.println("Origin was updated to "+ event.getNewValue() +" at row "+ (event.getTablePosition().getRow() + 1));
        });
    }
}

That’s it! You can also copy these codes for Table View in JavaFX and test it! If you want to learn this tutorial Table View in JavaFX via video, you can watch the youtube video below.

YouTube Video

]]>
https://kensoftph.com/how-to-use-the-table-view-in-javafx-perfect-tutorial/feed/ 0 TableView in JavaFX Tutorial for Beginners | INSERT DATA nonadult
JavaFX DirectoryChooser: 100% Perfect Step-By-Step Guide https://kensoftph.com/javafx-directorychooser-perfect-step-by-step-guide/ https://kensoftph.com/javafx-directorychooser-perfect-step-by-step-guide/#respond Sun, 26 Mar 2023 14:09:07 +0000 https://kensoftph.com/?p=3773 JavaFX DirectoryChooser is more likely the same as the File Chooser in JavaFX, which will open a directory dialog to browse a folder. Sometimes when you are creating an application, you may need to let the user browse the computer’s file system’s directory path. Creating the DirectoryChooser is very easy, so in this tutorial, you will learn how to use the DirectoryChooser in JavaFX.

How to use the JavaFX DirectoryChooser

Directory Chooser is very helpful for developers to incorporate folder or directory selection functionality in JavaFX application. To create the DirectoryChooser, we need to use its DirectoryChooser class to create an object of DirectoryChooser in JavaFX. Please see the following example code below to learn more.

DirectoryChooser directoryChooser = new DirectoryChooser();

In order to use the JavaFX DirectoryChooser, you can call the showDialog() method to display a dialog box and select a directory from the file system of the computer. To do that, proceed to the example code below to learn more about it.

directoryChooser.showDialog(stage);

Another useful and important feature of the JavaFX DirectoryChooser is setting the dialog title and the initial directory. The setInitialDirectory() method allows the user to have easier and faster access to the most frequently used directories. Please proceed to the example code given below to learn more about setting custom dialog titles and initial directories.

directoryChooser.setTitle("Select Directory");
directoryChooser.setInitialDirectory(new File(System.getProperty("user.home")+"/Desktop"));

Now, the best part of using the DirectoryChooser is to get the selected directory. We need to use a File class and if statement to identify if the file is not null. Please see the example code below for the full code and learn more about how to use the JavaFX DirectoryChooser.

BorderPane layout = new BorderPane();

Button button = new Button("Select");
Label label = new Label();

layout.setTop(button);
layout.setCenter(label);

BorderPane.setAlignment(button, Pos.CENTER);
BorderPane.setAlignment(label, Pos.CENTER);

button.setOnAction(actionEvent -> {
    DirectoryChooser chooser = new DirectoryChooser();
    chooser.setTitle("Select Directory");
    chooser.setInitialDirectory(new File(System.getProperty("user.home")+"/Desktop"));

    File directory = chooser.showDialog(stage);
    if(directory != null){
        label.setText(directory.toString());
    }
});

Scene scene = new Scene(layout, 320, 240);
stage.setTitle("JavaFX Directory Chooser");
stage.setScene(scene);
stage.show();

Output

JavaFX DirectoryChooser

YouTube Video

]]>
https://kensoftph.com/javafx-directorychooser-perfect-step-by-step-guide/feed/ 0 JavaFX DirectoryChooser Tutorial | 100% Perfect For Beginners nonadult
File Chooser in JavaFX: 100% Perfect Step-by-Step Guide https://kensoftph.com/file-chooser-in-javafx-perfect-step-by-step-guide/ https://kensoftph.com/file-chooser-in-javafx-perfect-step-by-step-guide/#respond Sat, 04 Mar 2023 09:08:00 +0000 https://kensoftph.com/?p=3741 JavaFX is a popular user interface (UI) toolkit for developing cross-platform desktop applications. One of the most common tasks in desktop applications is allowing the user to select and manipulate files using the File Chooser in JavaFX. JavaFX provides a built-in file chooser dialog that makes it easy to allow the user to select files and directories. However, customizing the file chooser in JavaFX to suit your application’s needs can be a bit more challenging.

In this blog post, we will take a step-by-step approach to creating a file chooser in JavaFX. We will start by exploring the basics of the built-in file chooser and how to use it to open and save files. Then, we will dive deeper into customizing the file chooser to fit your application’s look and feel, including setting custom extension file filters. By the end of this guide, you will have a good understanding of how to create a custom file chooser in your JavaFX application.

How to use the File Chooser in JavaFX

The JavaFX file chooser dialog provides a simple way for users to select files and directories. It can be used to open files, save files, and select directories. The basic usage of the file chooser involves creating an instance of the FileChooser class, calling its showOpenDialog() or showSaveDialog() method to display the dialog, and then retrieving the selected file or directory.

Create the JavaFX FileChooser

The first example we are going to do is to create the JavaFX FileChooser. As mentioned above, to create the FileChooser is to instantiate the FileChooser class. We then call the showOpenDialog() method, which displays the file chooser dialog and allows the user to select a file. If the user selects a file and clicks the “Open” button, the showOpenDialog() method returns the selected file as a File object. We can then use this object to perform some operations with the selected file. So, the following example below will show you how to create the File Chooser, and let’s assume that we are going to open a file.

FileChooser fileChooser = new FileChooser();
fileChooser.setTitle("Open a file");
File selectedFile = fileChooser.showSaveDialog(stage);
if (selectedFile != null) {
    // Do something with the selected file
}

Output

File Chooser in JavaFX

Customizing the File Chooser in JavaFX

In this example, you will know how to customize the JavaFX FileChooser. Customizing the JavaFX FileChooser is a great way to make the file selection process more user-friendly and tailored to your specific application. In addition to the basic functionality of selecting a file, you can customize the FileChooser to include options such as setting the initial directory, setting the dialog title, and creating custom extension file filters.

Here is an example code snippet that shows how to customize your File Chooser in JavaFX.

FileChooser fileChooser = new FileChooser();
fileChooser.setTitle("Open a file");
fileChooser.setInitialDirectory(new File(System.getProperty("user.home")+ "/Pictures"));
fileChooser.getExtensionFilters().addAll(new FileChooser.ExtensionFilter("JPEG Image","*.jpg"), new FileChooser.ExtensionFilter("PNG Image", "*.png"), new FileChooser.ExtensionFilter("All image files","*.jpg","*.png"));
File selectedFile = fileChooser.showOpenDialog(stage);
if(selectedFile != null){
    // Do something with the selected file
}

Setting the initial directory of the File Chooser in JavaFX is an important step to provide a better user experience. Setting the initial directory to a location that makes sense for the user can save them time and effort. Setting the dialog title is another way to customize the FileChooser. By default, the FileChooser will display a generic title such as “Open” or “Save” depending on the intended use. However, you can customize the title to better reflect the purpose of the file selection. You can set the title of the FileChooser using the setTitle() method.

Creating custom extension file filters is another way to customize the FileChooser. By default, the FileChooser will display all files and allow the user to select any file type. However, you may want to limit the user’s selection to specific file types. You can create a custom file filter using the ExtensionFilter class and add it to the FileChooser using the getExtensionFilters() method.

Save using the File Chooser in JavaFX

In the example, we will show you how to use the JavaFX FileChooser when saving a file. Since we are done doing the showOpenDialog() method for opening a file. In this case, we will now use the showSaveDialog() method for saving a file. The process of using the FileChooser to save a file is very similar to opening a file. The main difference is that instead of using the showOpenDialog() method, we will use the showSaveDialog() method to display the FileChooser dialog and allow the user to select a file for saving.

FileChooser fileChooser = new FileChooser();
fileChooser.setTitle("Save a file");
fileChooser.setInitialDirectory(new File(System.getProperty("user.home")+ "/Desktop"));
fileChooser.getExtensionFilters().add(new FileChooser.ExtensionFilter("Text file","*.txt"));
fileChooser.setInitialFileName("Untitled");
File selectedFile = fileChooser.showSaveDialog(stage);
if(selectedFile != null){

    try {
        FileWriter fileWriter = new FileWriter(selectedFile);
        BufferedWriter writer = new BufferedWriter(fileWriter);
        writer.write("Learning how to use the JavaFX FileChooser");
        writer.close();
        System.out.println("The file has been saved in "+ selectedFile.getAbsolutePath());
    } catch (IOException e) {
        throw new RuntimeException(e);
    }

}

Output

File Chooser in JavaFX JavaFX FileChooser

YouTube Video

]]>
https://kensoftph.com/file-chooser-in-javafx-perfect-step-by-step-guide/feed/ 0 JavaFX File Chooser Tutorial For Beginners nonadult