If you are a beginner to JavaFX or an experienced programmer looking to add some drag and drop functionality to your GUI applications, you’ve landed on the right page. In this tutorial, we will talk about JavaFX drag and drop and specifically, about javafx drag and drop image and if you want to learn more about drag and drop, you can go to this documentation to learn more.
Understanding JavaFX
JavaFX is a powerful tool used to create and deliver desktop applications, along with rich interactive JavaFX Controls such as Button, Label, TreeView, TableView and more. One of the many standout features that JavaFX offers is its built-in support for drag and drop, enabling users to move data in a graphical way.
JavaFX Drag and Drop Basics
To implement the drag and drop feature in a JavaFX application, you need to manage a series of events. An essential point to remember is that the drag and drop operation in JavaFX comprises three stages of Drag Events such as ‘drag detected‘, ‘drag over‘, and ‘drag dropped‘.
- Drag Detected: This event indicates the initiation of a drag and drop gesture. Here, we define what we are transferring with our drag operation via a Dragboard.
- Drag Over: Takes place when the mouse moves over a node during the drag and drop gesture. Here, the program decides whether to accept or reject the drag operation based on the type of data being transferred.
- Drag Dropped: Happens when the user releases the mouse button, i.e., drops the item. It defines how to handle the event of dropping the data.
But in this tutorial, I will only use the Drag Over and Drag Dropped to perform the action.
Implementing Drag and Drop Image in JavaFX
A practical application of JavaFX drag and drop is moving images within the application. Here’s a simple way to do that:
First, ensure you have an ImageView defined in your JavaFX application. We handle drag and drop events for this ImageView. You can use SceneBuilder to achieve this in an easier way.
Code
    @FXML
    private ImageView imageView;

    @FXML
    void imageViewDragDropped(DragEvent event) {
        Dragboard dragboard = event.getDragboard();
        if(dragboard.hasImage() || dragboard.hasFiles()){
            try {
                imageView.setImage(new Image(new FileInputStream(dragboard.getFiles().get(0))));
            } catch (FileNotFoundException e) {
                throw new RuntimeException(e);
            }
        }
        event.consume();
    }

    @FXML
    void imageViewDragOver(DragEvent event) {
        Dragboard dragboard = event.getDragboard();
        if(dragboard.hasImage() || dragboard.hasFiles()){
            event.acceptTransferModes(TransferMode.COPY);
        }

        event.consume();
    }
Output
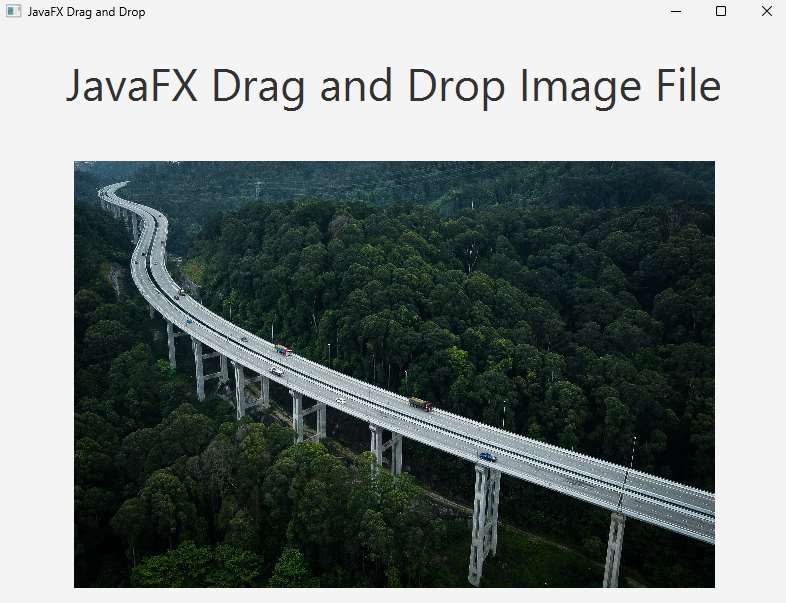
In this code, in imageViewDragDropped we check if the Dragboard has an image. If it does, we set that image to the ImageView. In imageViewDragOver, we check the same condition and if true, we accept the transfer modes.
Remember to call event.consume().It is used to stop the further propagation of the event to parent nodes – effectively saying “This event has been handled”.
Why Implement JavaFX Drag and Drop?
Besides offering an intuitive interaction mode, the drag and drop API in JavaFX keeps your code neat and structured as you are coding according to a set of predefined events. It provides an engaging user experience, contributing to the overall UI of your application.
In summary, whether you’re developing a simple or complex GUI application, incorporating javafx drag and drop can significantly enhance your application’s UX. JavaFX’s simplicity, robustness, and flexibility make it an ideal technology for building modern Java applications. Whether it’s JavaFX drag and drop image or other features, JavaFX brings a lot of benefits to the table.
JavaFX’s drag and drop is straightforward to understand, even for beginners. By following this tutorial, you should be well on your way to creating interactive JavaFX applications.
Remember, practical implementation is key to mastering any concept. So, try out this code snippet to familiarize yourself with the process. Explore more functionalities that javafx drag and drop offers, and discover how you can make your applications more interactive. Happy coding!


