How to install IntelliJ IDEA on Windows 10 and 11
IntelliJ IDEA is a very popular IDE for Java applications, and it is a user-friendly IDE that is perfect to use especially if you are a beginner. Installing IntelliJ IDEA 2022 is a perfect choice of IDE, and it comes with many features for you to develop applications easily. The question is how to install IntelliJ IDEA on Windows 10 and 11, before we go through the installation of the IDE, we will go through a quick summary of the IDE.
IntelliJ IDEA has two editions for you to choose from: the Community Edition and the Ultimate version. This IDE comes with a paid version which is the Ultimate version, and if you can’t afford the Ultimate version, you can still use the Community Edition for you to develop applications with ease. The Community Edition is an open-source IDE that provides all basic features for Java Virtual Machine and Android development.
Otherwise, the Ultimate version is used for commercial use. If you are a student or teacher, develop an open-source application, Java Champion, etc. You can have a free license from JetBrains if you ask for it.
Installing IntelliJ IDEA 2022 System Requirements
Things you must know before installing IntelliJ IDEA 2022. Make sure your machine or computer must have at least the minimum system requirements. Kindly see the table below to learn more about IntelliJ IDEA’s system requirements.
| Requirement | Minimum | Recommended |
|---|---|---|
| RAM | The minimum requirement for RAM is 2 GB | 8 GB of RAM |
| CPU | Any modern CPU | Any modern CPU |
| MONITOR RESOLUTION | 1024×768 | 1920×1080 |
You don’t need to install Java to install IntelliJ IDEA because the good thing is IntelliJ IDEA bundled the Java Runtime Environment based on JRE 11. However, if you want to develop Java applications, a standalone Java Development Kit is required.
Now, I will walk you through the process of installing the IDE. Installing the IDE is very simple and easy. What do we need to do to install the IDE? Obviously, you need to have an installer to install the IDE. The following guide will be the step-by-step tutorial for installing the IntelliJ IDEA IDE (Integrated Development Environment).
Installing IntelliJ IDEA 2022 Step-By-Step Tutorial
Make sure your computer meets the minimum system requirements before installing the IDE. Download the IntelliJ IDEA Community or Ultimate version. Once you have downloaded the application, please proceed below and follow the steps of installation.
Steps to do:
- Download the installer
- Run or open the installer and follow the steps below.
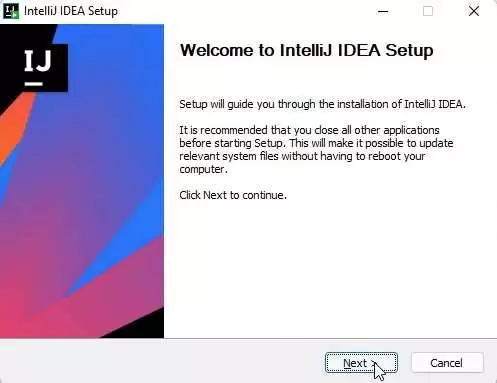
- A welcome dialog will show and click on next.
- Choose the installation location or leave that as default.
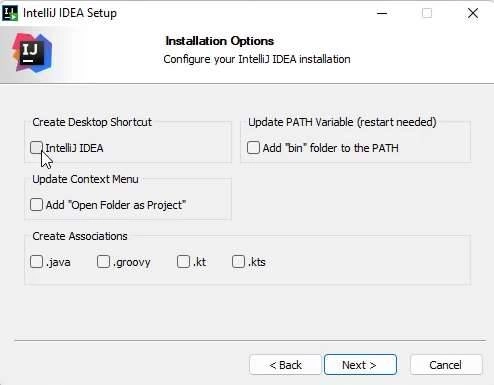
- Installation Options – You may check the Create Desktop Shortcut and if you want to open a project by right-clicking the folder, you can check the “Open folder as project”. Make sure you check the Update PATH variable and check the Create Associations if you are developing .java, .groovy, .kt, and .kts. Check it.
- Click next and install, and wait for the process to be completed.
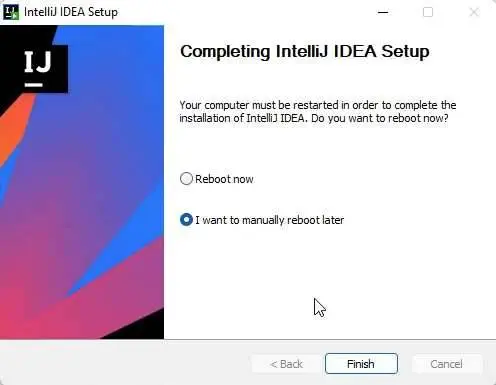
- Once the installation has been completed, you can choose to reboot now to restart the computer and automatically make the changes take effect.
- Done, enjoy coding with IntelliJ IDEA IDE.
When you open your IDE, log in to your JetBrains account if you are using the IntelliJ IDEA Ultimate version. That is it: you can now develop your application with the most popular and intelligent Java IDE. If you are developing JavaFX applications, you can learn more about developing JavaFX applications here.
Developing Java applications is not so easy, but practice makes us perfect. I hope this tutorial meets the expectations of your questions. Enjoy coding!


