How to use CheckBox in JavaFX
The checkBox in JavaFX is one of the most common controls used in JavaFX applications. They allow users to select multiple items from a list of choices. JavaFX CheckBox is a graphical control or node that allows the user to select multiple options, and it has three states: unchecked, checked, and undefined. The undefined state is also known as an indeterminate state. I will show you what that looks like later.
In this tutorial, you will learn how to create a simple JavaFX CheckBox control. A checkBox in JavaFX is part of the choice buttons, and it is very simple to create and understand how it works. It works like the JavaFX ToggleButton and JavaFX RadioButton. The following example will walk you through creating a checkbox in JavaFX, and many more examples to follow.
Create the JavaFX CheckBox
It is very easy to create the JavaFX CheckBox using its constructor. You can initially assign a name to the JavaFX CheckBox. See the following code snippet below to learn more.
// Creating the JavaFX CheckBox
CheckBox cb = new CheckBox("This is a CheckBox");
The text in the checkbox constructor is the name or will be displayed in the JavaFX CheckBox control.
Add the JavaFX CheckBox to the Scene Graph
You must use a JavaFX Layout to display the CheckBox in your application. Layout in JavaFX is a container for the nodes, and adding the layout in your JavaFX application is very easy, and you also need to use its constructor to create it. The following code snippet below shows you how to add or display your JavaFX CheckBox to the Scene graph.
import javafx.application.Application;
import javafx.scene.Scene;
import javafx.scene.control.CheckBox;
import javafx.scene.layout.StackPane;
import javafx.stage.Stage;
import java.io.IOException;
public class HelloApplication extends Application {
@Override
public void start(Stage stage) throws IOException {
// Create the layout
StackPane root = new StackPane();
// Create the CheckBox and add to scene graph
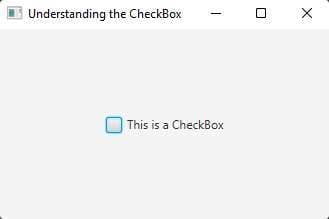
CheckBox cb = new CheckBox("This is a CheckBox");
root.getChildren().add(cb);
Scene scene = new Scene(root, 400, 400);
stage.setScene(scene);
stage.setTitle("Understanding the CheckBox");
stage.show();
}
public static void main(String[] args) {
launch();
}
}
Output
Setting Text in JavaFX CheckBox
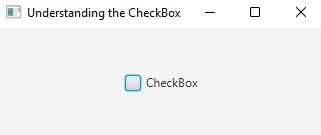
To set the name or text in the checkbox is really simple to do, you need to use the setText() method to change the displayed name or text in the JavaFX CheckBox. Changing the text in your checkbox depends on your application requirements. You can change the text anytime, but it depends on the requirements. Proceed to the following code snippet below to learn more about setting the text in your JavaFX CheckBox.
CheckBox cb = new CheckBox("This is a CheckBox");
cb.setText("CheckBox");
Output
Determining CheckBox State
There are three types of states in the JavaFX CheckBox. As mentioned above, these are the unselected, selected, and indeterminate states. The states mean that the unselected and selected are not selected and selected. Otherwise, the indeterminate state means that it is neither selected nor not selected. Please proceed to the following code snippet below to learn more about how to identify the states in CheckBox.
CheckBox cb = new CheckBox("CheckBox");
Label state = new Label("State");
cb.setAllowIndeterminate(true);
cb.setIndeterminate(true);
if(cb.isIndeterminate()){
    state.setText("State: UNDEFINED");
}else if(cb.isSelected()){
    state.setText("State: CHECKED");
}else{
    state.setText("State: UNCHECKED");
}
Setting Style or CSS
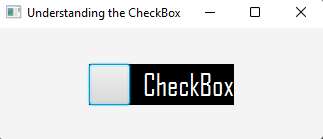
You can add CSS to your JavaFX application. Adding CSS to an application makes it more beautiful and has a higher chance to be loved by your users. There are two different ways to add a style to your JavaFX application: using inline code or creating an external CSS file. Use the setStyle() method if you want to add an inline-code for setting the style. If you want to learn more about how to create an external CSS from your JavaFX application, then watch the YouTube video below.
The following code snippet below will teach you how to use the setStyle() method to set the style in your application.
CheckBox cb = new CheckBox("CheckBox");
cb.setStyle("-fx-background-color: black; -fx-text-fill: white; -fx-font-size: 30; -fx-font-family: 'Agency FB'");
Output
YouTube Video

Set Graphic or Icon JavaFX CheckBox Example
You will learn how to set graphic or icon in your CheckBox. You need to use the setGraphic() method to set the icon or graphic in your JavaFX CheckBox. See the following code snippet below to learn more about how to add an icon to your JavaFX nodes.
// adding a graphic outside from your project
ImageView iv = new ImageView(String.valueOf(new File("C:\\Users\\Kensoft\\Desktop\\Checkbox-in-javafx-style.jpg")));
cb.setGraphic(iv);

// adding a graphic from your project resources
ImageView iv = new ImageView("/res/Checkbox-in-javafx-style.jpg");
cb.setGraphic(iv);
YouTube Video