How to use the Group in JavaFX Layout
Group in JavaFX has a feature of a container, it has its own layout policy, and coordinate system, and it is a subclass of a parent class. Group is best reflected by calling it a collection of nodes rather than a container, because the Group is used to manipulate a collection of nodes.
You can control all the nodes in your JavaFX application once the nodes are inside the Group. If you have nodes inside the Group, you can apply effects, transformations, and other properties applied to a Group. The used properties of a Group will reflect it in all nodes in the Group.
Since the Group in JavaFX has its own layout policy and when you add nodes in the Group, all nodes or children are positioned at the 0,0 axes by default. You must manually write the code to place all nodes inside the Group. We can use LayoutX and LayoutY to set them easily.
Creating the Group in JavaFX
There are options to create the Group object. We can use the no-args constructor to create an empty group. Group obj = new Group(); It is what a no-args constructor looks like. We can also use the var-args constructor to create the Group. For example: Group obj = new Group(btn1, btn2); .
We created the Group with two Buttons inside the Group using the var-args constructor in making the Group.
Adding children to a Group in JavaFX
A container is meant to contain children or nodes. Since the Group has a feature of a container, we can add children to it. We can add children when creating the object or after creating the object. Using the getChildren() method, we can add children to the container. See the example code below.
// adding the nodes using the no-args constructor
Group obj = new Group();
obj.getChildren().addAll(btn1, btn2);

// or add them one by one
obj.getChildren().add(btn1);
obj.getChildren().add(btn2);

// adding the nodes using the var-args constructor
Group obj = new Group(btn1, btn2);
If you run that piece of code, your nodes will overlap because we haven’t set the position of the nodes. Set the LayoutX and LayoutY to place them in your desired position.
Example
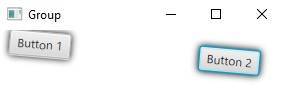
In this example, we learn to set the position of the nodes and add effects and transformation to see what that looks like using the Group layout.
import java.io.IOException;
import javafx.application.Application;
import javafx.scene.Group;
import javafx.scene.Scene;
import javafx.scene.control.Button;
import javafx.scene.effect.DropShadow;
import javafx.stage.Stage;

/**
 *
 * @author KENSOFT
 */
public class JavaFXLayout extends Application {

    @Override
    public void start(Stage stage) throws IOException {

        Button btn1 = new Button("Button 1");
        Button btn2 = new Button("Button 2");

        btn1.setLayoutX(10);
        btn1.setLayoutY(10);
        btn2.setLayoutX(200);
        btn2.setLayoutY(10);

        Group root = new Group();
        root.getChildren().addAll(btn1, btn2);
        root.setEffect(new DropShadow());
        root.setRotate(5);

        Scene scene = new Scene(root);
        stage.setScene(scene);
        stage.setTitle("Group");
        stage.show();
    }

    public static void main(String[] args) {
        launch(args);
    }
}
Output


