JavaFX MenuBar is one of the essentials when developing a desktop application. In this tutorial, we will make the Menu bar, and you will learn how to use the Menu bar in JavaFX. The menu bar is the same navigation bar on the website and creating a Menu bar in a desktop application is very easy, but it still depends on the programming language. In this case, we will make the Menu bar, and you will learn how to use the Menu bar in JavaFX.
A menu bar is a horizontal bar that holds the menus in your application. In this tutorial, I will walk you through creating the menubar in your JavaFX application and show more examples for you to learn more about the Menu bar in JavaFX. Keep reading below to learn more, the first step we are going to do is create the menu bar and show it to the scene graph and to be followed by other examples.
How to use the Menu Bar in JavaFX
Creating the Menu bar is very easy and there are two ways for you to choose to create it easily, you either use the Scene Builder application to create the graphical user interface in JavaFX easily or code it manually, and I prefer to show coding examples here rather than using the Scene Builder because I want you to learn on how to code it.
To create this control, we will use its default constructor by calling the MenuBar class and instantiating it. Please go ahead to the example code below to see how it is created.
// creating the menu bar using its default constructor
MenuBar menuBar = new MenuBar();
Add the JavaFX Menubar to the scene graph
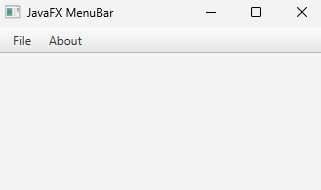
To add our Menu bar to the scene graph, we also need to create the layout in JavaFX as a container for our nodes. In this example, I’m going to use the BorderPane layout. Creating and adding it to the scene is very easy to do, proceed to the example code below to learn more.
// create the layout
BorderPane layout = new BorderPane();
// create the menubar
MenuBar menuBar = new MenuBar();
// adding menus
Menu file = new Menu("File");
Menu about = new Menu("About");
// set to top in borderPane layout
layout.setTop(menuBar);
menuBar.getMenus().addAll(file,about);
// create the scene
Scene scene = new Scene(layout, 500, 500);
stage.setScene(scene);
stage.setTitle("JavaFX MenuBar");
stage.show();
Output
Use SystemMenuBar property
This property is a boolean type, and you can set it to true or false. It will use the system menu bar if the platform supports it. If you are using Mac and your Mac supports a system menu bar then the MenuBar will use the system menu bar to display its items.
menuBar.setUseSystemMenuBar(true);
Adding graphics to the Menus
You have already created the menus above. The menu is the buttons in the menu bar. You can also add a graphic to the menu by using the setGraphic() method. Please go ahead below to learn more.
Menu file = new Menu("File");
file.setGraphic(new ImageView(new Image("file.png")));
Adding JavaFX Menu Item
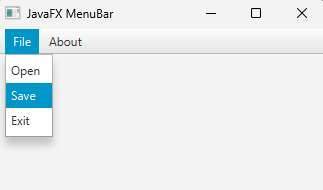
JavaFX Menu Item is part of the Menu Bar in JavaFX. The Menu Item is the button that will pop up if you click the menus of the menu bar. To create the Menu Items, you need to use its constructor. Please see the following example code below to learn more about it.
MenuItem item1 = new MenuItem("Open");
MenuItem item2 = new MenuItem("Save");
MenuItem item3 = new MenuItem("Exit");
Add the Menu item to Menu
You need to use the Menu object and use the getItems() method to add the menu items to a specific menu button. In this tutorial, we will use the File menu, and let’s add the JavaFX Menu Item. Please proceed below to learn more.
// call the file menu (refer to the example code above)
file.getItems().add(item1, item2, item3);
Output
Adding graphic to the Menu Item
Adding a graphic to the menu item is the same as how you add a graphic to the Menus. Please continue below to learn more.
MenuItem item1 = new MenuItem("Open");
item1.setGraphic(new ImageView(new Image("open.png")));
Adding an event to a menu item
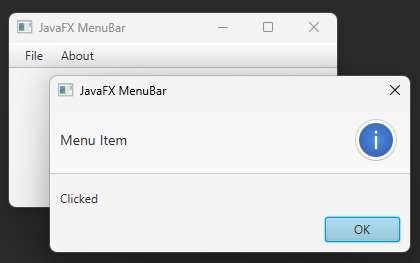
Setting an event to a menu item is very important to make your menu items work to perform an action when the user wants to click the JavaFX Menu Item. In this example, we will set an action event for our menu items.
item1.setOnAction(event -> {
     alert();
});
item2.setOnAction(event -> {
     alert();
});
item3.setOnAction(event -> {
     alert();
});

private void alert(){
    Alert alert = new Alert(Alert.AlertType.INFORMATION);
    alert.setTitle("JavaFX MenuBar");
    alert.setHeaderText("Menu Item");
    alert.setContentText("Clicked");
    alert.show();
}
The method alert() shows an alert when one of the menu items is clicked. Creating an alert in JavaFX is also easy, and you can also implement the alert in your application.
Output
Adding JavaFX RadioMenuItem
JavaFX RadioMenuItem is also a menu item, but it looks different because it has a checkmark on the left side of the item when you select it. When you want to add multiple RadioMenuItem, you will also need to use the ToggleGroup if you only want one RadioMenuItem to be selected, just like how you use it on ToggleButton, RadioButton, or CheckBox. We need to use the RadioMenuItem’s constructor to create this item, and it is really easy to do.
// Create the RadioMenuItem
RadioMenuItem r1 = new RadioMenuItem("True");
RadioMenuItem r2 = new RadioMenuItem("False");
Grouping using ToggleGroup
Grouping the RadioMenuItem using the ToggleGroup allows you to only select one RadioMenuItem. The following example code below will show you how to add them to the ToggleGroup.
RadioMenuItem r1 = new RadioMenuItem("True");
RadioMenuItem r2 = new RadioMenuItem("False");
ToggleGroup rGroup = new ToggleGroup();
rGroup.getToggles().addAll(r1, r2);
Add the RadioMenuItem to the Menu
To make our RadioMenuItem visible to our application, you also need to add them to the Menu. As mentioned above, you need to use the getItems() method to add items to the Menu.
Menu menu = new Menu("Save As");
menu.getItems().addAll(r1, r2);
Adding an event to our RadioMenuItem
Adding an event to our RadioMenuItem is very easy, just like adding an event to other nodes. This will make our nodes work or function. The example code below will show you how to add an event to the JavaFX RadioMenuItem.
RadioMenuItem r1 = new RadioMenuItem("True");
RadioMenuItem r2 = new RadioMenuItem("False");
ToggleGroup rGroup = new ToggleGroup();
rGroup.getToggles().addAll(r1, r2);

r1.setOnAction(event -> {
    alert();
});
r2.setOnAction(event -> {
    alert();
});
Working with Submenu items in JavaFX
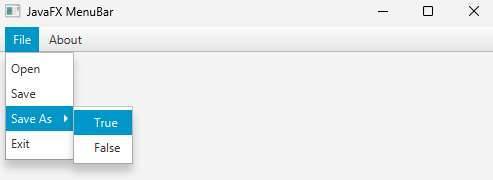
Submenu is also important if you have a bunch of options in that particular menu. Creating a Submenu in JavaFX is very easy and what you need to do is to create the main menu. For example, a “save as” submenu also uses the Menu class to create the submenu but to make it a submenu, you need to add this menu to the main menu and then create menu items for it. The example code below will show you how it is done.
MenuBar menuBar = new MenuBar();
Menu file = new Menu("File");
Menu about = new Menu("About");
menuBar.getMenus().addAll(file,about);

// this RadioMenuItem
RadioMenuItem r1 = new RadioMenuItem("True");
RadioMenuItem r2 = new RadioMenuItem("False");
ToggleGroup rGroup = new ToggleGroup();
rGroup.getToggles().addAll(r1, r2);

// This one submenu item
Menu submenu = new Menu("Save As");
submenu.getItems().addAll(r1, r2);

file.getItems().addAll(item1, item2, submenu, item3);
Output
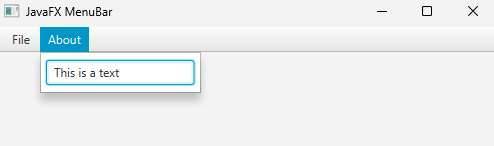
Working with CustomMenuItem
A CustomMenuItem is one of the powerful menu item types. It is powerful because it can handle nodes inside the CustomMenuItem. For example, you can add a Button, Textfield, or an HBox as a MenuItem. The example code below will show you how to create the CustomMenuItem in JavaFX.
// Custom Menu Item
CustomMenuItem customItem = new CustomMenuItem();
TextField text = new TextField();
customItem.setHideOnClick(false);
customItem.setContent(text);
If you noticed the setHideOnClick() method is used to stay visible when you are interacting with the TextField inside the CustomMenuItem. Otherwise, it will hide immediately if you are clicking the TextField when the setHideOnClick() method is true. Try it yourself to check it out.
Output
Working with SeparatorMenuItem in JavaFX
SeparatorMenuItem is just a separator, it is used to separate menu items if the item belongs to the other group. The following example code below will show you how to add a SeparatorMenuItem to JavaFX.
MenuBar menuBar = new MenuBar();
Menu file = new Menu("File");
Menu about = new Menu("About");
menuBar.getMenus().addAll(file,about);

// this RadioMenuItem
RadioMenuItem r1 = new RadioMenuItem("True");
RadioMenuItem r2 = new RadioMenuItem("False");
ToggleGroup rGroup = new ToggleGroup();
rGroup.getToggles().addAll(r1, r2);

// This one submenu item
Menu submenu = new Menu("Save As");
submenu.getItems().addAll(r1, r2);

SeparatorMenuItem separatorMenuItem = new SeparatorMenuItem();

file.getItems().addAll(item1, item2, submenu, separatorMenuItem, item3);
Output

YouTube Video