How to use the JavaFX Pagination
JavaFX Pagination is very useful when your application displays a large single content. Creating the Pagination in JavaFX is very easy and there are two ways to create this node or control it in your JavaFX application. You can either use the Scene Builder or code it manually to create this node.
This pagination control is very user-friendly, when you put in place this node in your application it will show the page count, and you can also click the buttons to go to the other page. The pagination control has two areas and these are the Content Area and the Navigation Area.
The Content Area displays the content of the page, for example, images or text. The Navigation Area has buttons for the user that allow it to go to another page when it is clicked.
In this tutorial, you will learn how to use the JavaFX Pagination and put it in place in your application. I will walk you through creating this control using the Scene Builder and code it manually and add some content to the pages. Go ahead to the examples below to learn more about the JavaFX Pagination.
JavaFX Pagination Examples
The first example we will learn is by creating this node or control. The examples provided below are very easy to follow and learn. Using the WYSIWYG is very easy to do; you simply drag and drop the node to your scene graph, and this is the power of using the Scene Builder. You can watch the video tutorial below to learn more about it.
How to create the JavaFX pagination
To create the Pagination in JavaFX when we code is very easy, we will create an instance of the Pagination Class. While instantiating the constructor, we can enter some parameters into it or either leave it as nothing. The parameter uses an integer for the parameter to work because it is used for page count. The example code snippet below will show you how to create a pagination control in JavaFX.
// create the Pagination (Indeterminate)
Pagination pagination = new Pagination();

// create the Pagination with page count
Pagination pagination = new Pagination(10);
How to add the node to the Scene Graph
It is important for the node to display in your application, by adding the node to the scene, we will create the layout in JavaFX and also create the Scene. If you are using the Scene Builder to create the GUI, you can watch the video to learn how to load or display the FXML document. The example code below will show you how to add the node to the scene.
// create the JavaFX Layout
StackPane layout = new StackPane();
// create the Pagination
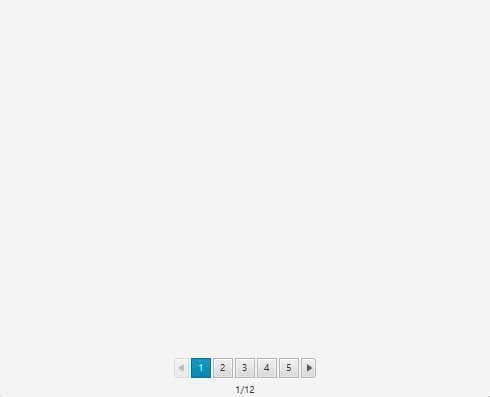
Pagination pagination = new Pagination(10);
// add the pagination to the layout
layout.getChildren().add(pagination);
// create the Scene
Scene scene = new Scene(layout, 500, 500); // 500x500 is the scene size
// add to the stage
stage.setScene(scene);
stage.setTitle("Understanding the Pagination");
stage.show();
Output
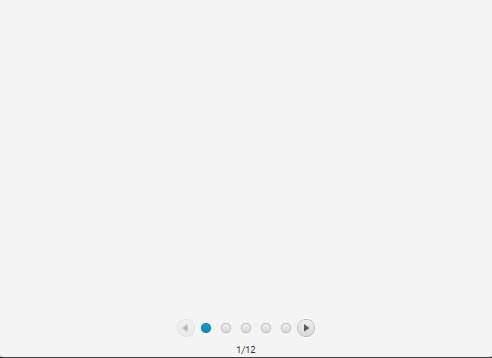
Change the page indicator style
The default page indicator for the pagination is the numeric button and the other one is the bullet button. If you want to change the page indicator to the other one, you can use the getStyleClass() method. The example code below will show you how to do it.
Pagination pagination = new Pagination(10);
pagination.getStyleClass().add(Pagination.STYLE_CLASS_BULLET);
Output
Full code example 1: How to add content to the JavaFX Pagination
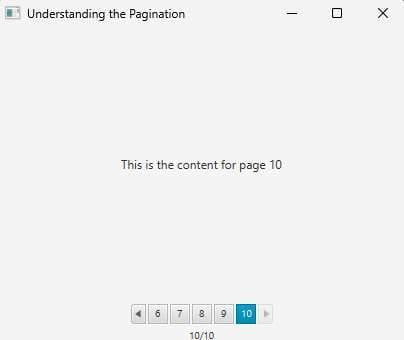
When adding content to the pagination control, we need to use the setPageFactory() method. This method is very important to use the JavaFX Pagination, without this method, your pagination is useless. It is used to generate pages and whatever node you want to display with the setPageFactory() method, it calls the call() method to return it to the Content Area. The example code below will show you how to add content to the pagination in JavaFX.
import javafx.application.Application;
import javafx.scene.Scene;
import javafx.scene.control.Label;
import javafx.scene.control.Pagination;
import javafx.scene.layout.StackPane;
import javafx.stage.Stage;

import java.io.IOException;

public class Main extends Application {
    @Override
    public void start(Stage stage) throws IOException {
        Pagination pagination = new Pagination(10);
        pagination.setPageFactory(this::getPage);
        pagination.setMaxPageIndicatorCount(5);
        StackPane layout = new StackPane(pagination);
        Scene scene = new Scene(layout, 500, 500);
        stage.setTitle("Understanding the Pagination");
        stage.setScene(scene);
        stage.show();
    }

    private Label getPage(int pageIndex){
        Label content = new Label("This is the content for page "+(pageIndex + 1));
        return content;
    }

    public static void main(String[] args) {
        launch();
    }
}
Output
Full code example 2: How to add content to the JavaFX Pagination
This example is different compared to the first full code example. The content of it consists of images that will display in the pagination content area. I will only show the controller class here and go to this link if you want to see the whole project.
import javafx.embed.swing.SwingFXUtils;
import javafx.event.ActionEvent;
import javafx.fxml.FXML;
import javafx.fxml.Initializable;
import javafx.scene.control.Pagination;
import javafx.scene.image.Image;
import javafx.scene.image.ImageView;
import javafx.scene.layout.VBox;
import javafx.stage.DirectoryChooser;
import javafx.stage.Stage;

import javax.imageio.ImageIO;
import java.awt.image.BufferedImage;
import java.io.File;
import java.io.FilenameFilter;
import java.io.IOException;
import java.net.URL;
import java.util.ResourceBundle;

public class PaginationController implements Initializable {

    @FXML
    private Pagination pagination;
    private File files[];

    @FXML
    void getImages(ActionEvent event) {
        Stage stage = (Stage) pagination.getScene().getWindow();
        openImages(stage);
        pagination.setPageFactory(this::getPages);
    }

    public VBox getPages(int pageIndex){
        ImageView imageView = new ImageView();
        File pngs = files[pageIndex];
        try{
            BufferedImage bi = ImageIO.read(pngs);
            Image image = SwingFXUtils.toFXImage(bi,null);
            imageView.setFitWidth(500);
            imageView.setFitHeight(500);
            imageView.setImage(image);
            imageView.setSmooth(true);
        }catch (IOException e){

        }
        VBox layout = new VBox(imageView);
        return layout;

    }

    private void openImages(Stage parentStage){
        DirectoryChooser chooser = new DirectoryChooser();
        chooser.setTitle("Select a folder");
        chooser.setInitialDirectory(new File("C:\\"));
        File getFiles = chooser.showDialog(parentStage);
        if(getFiles != null){
            FilenameFilter filter = new FilenameFilter() {
                @Override
                public boolean accept(File dir, String name) {
                    return name.toLowerCase().endsWith(".png");
                }
            };
            files = getFiles.listFiles(filter);
        }
    }

    @Override
    public void initialize(URL url, ResourceBundle resourceBundle) {
        pagination.setPageCount(12);

    }
}
Output

Adding CSS to the JavaFX Pagination
You can also add CSS to your JavaFX application. JavaFX CSS is almost like CSS for the web. Adding CSS to the JavaFX Pagination is very easy. Go ahead below to learn more about Pagination CSS.
.pagination {
 -fx-page-information-visible: false;
}
.pagination > .page {
 -fx-background-color: lightgray;
}
.pagination > .pagination-control > .control-box {
 -fx-padding: 2;
 -fx-border-style: dashed;
 -fx-border-width: 1;
 -fx-border-radius: 5;
 -fx-border-color: blue;
}
YouTube Video