Working with the JavaFX button is very easy, and it is one of the first steps in learning JavaFX programming. The button plays a very important role in your application. There are three types of controls in JavaFX that represent buttons. These are “buttons to execute commands, buttons to make choices, and buttons to execute commands as well as make choices.”
You will learn how to use the JavaFX Button. So, a button can be activated in different ways, for example, by clicking it using a mouse, a mnemonic, an accelerator key, or other combinations. When the button is activated, it will execute a command known as a command button.
Examples of buttons to make choices are ToggleButton, CheckBox, and RadioButton.
JavaFX Button Tutorial with examples
We will learn the essential uses of the JavaFX Button, and we will go over the basic examples of Buttons in JavaFX, like creating the button, Getters, and Setters, adding styles, and more. The first step we are going to do is to create the button in JavaFX. Please proceed below to learn more.
Creating a button in JavaFX
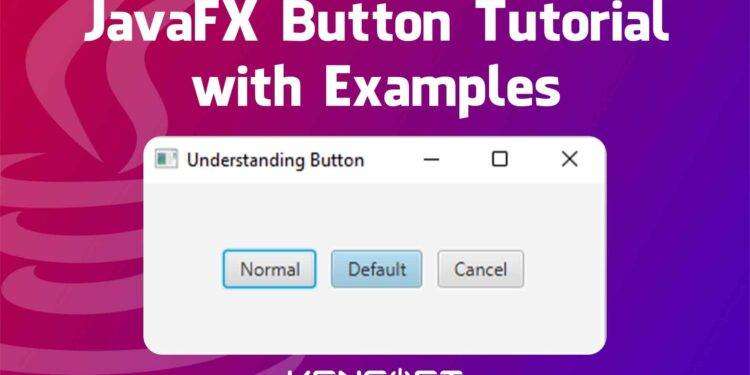
Creating a button in JavaFX is very simple and easy. We need to create a button object and add a label or a button name. A button can work in one of 3 ways. This can be a normal, default, or cancel button.
A normal button is activated when the ActionEvent is fired. At the same time, the default button is activated when the Enter key on the keyboard is pressed, but no other node in the scene consumes the Enter key event, and when the Esc key is pressed, the cancel button is activated, and no other node consumes the Esc key event.
Normal Button Example
Below is an example of a normal button. Let’s proceed and make the JavaFX Button with an action event.
// Normal Button
Button normalButton = new Button("Normal Button");
normalButton.setOnAction(e -> function());
Default Button Example
Below is an example of a default button. Let’s proceed and make an action event.
// Default Button
Button defaultButton = new Button("Default Button");
defaultButton.setDefaultButton(true); // Make it a default button
defaultButton.setOnAction(e -> function());
Cancel Button Example
Below is an example of a cancel button. Let’s proceed and make an action event.
// Cancel button
Button cancelButton = new Button("Cancel Button");
cancelButton.setCancelButton(true);
cancelButton.setOnAction(e -> function());
Add the button to a Scene Graph Example
To make our button visible to the users, we need to add the button to the Scene Graph, and we have two options for adding the button. The button can be directly added to the scene or a layout in JavaFX. Click the link to learn more, and proceed below to learn how to add the button to a Scene Graph.
import javafx.application.Application;
import javafx.scene.Scene;
import javafx.scene.control.Button;
import javafx.scene.layout.AnchorPane;
import javafx.stage.Stage;

/**
 *
 * @author KENSOFTPH.COM
 */

public class UnderstandingButton extends Application {

    @Override
    public void start(Stage stage) {

        // Adding the button with layout pane
        AnchorPane root = new AnchorPane();
        Button btn = new Button("Button");
        root.getChildren().add(btn);
        Scene scene = new Scene(root);

        // Or adding the button directly to the Scene
        Button btn = new Button("Button");
        Scene scene = new Scene(btn);

        stage.setScene(scene);
        stage.setTitle("Understanding Button");
        stage.show();
    }

    public static void main(String[] args) {
        launch(args);
    }
}
JavaFX Button Getter and Setter Example
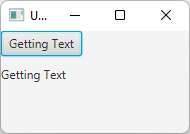
Using the JavaFX Button getter and setter is very easy. You need to use these functions if you want to set the label of the button or rename the existing label of the button. On the other hand, the getter function is used to get the label or the name of the button. Please proceed below to learn more.
// Setter
Button btn = new Button();
btn.setText("Setting text");

// Getter
Button btn = new Button("Getting Text");
Label lbl = new Label("Rename");
btn.setOnAction(e ->{ lbl.setText(btn.getText()); });
Output
JavaFX Button Text Wrapping Example
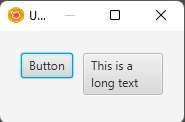
Text wrapping is also possible on the JavaFX button. Enabling the text wrapping will help you read the text if the text is longer than the button and the text will break into multiple lines until the text is visible. To set the text wrapping, you only need to use the setWrapText() method and set the parameter to true.
Button btn = new Button("This is a long text");
btn.setWrapText(true);
Output
Adding an image to a button Example
You can also add an image inside the button. Adding an image to a button is also a way to describe and make it more beautiful. To add an image inside the button, we need to use the ImageView. ImageView is also a node used for painting images. Please proceed below to learn more.
Button btn = new Button("Button");
ImageView image = new ImageView("/res/sample.png");
btn.setGraphic(image);
Output

Adding Styles to a Button Example
JavaFX Button has a feature to add styles or CSS in JavaFX. You can easily add an inline style or external CSS to your JavaFX application. If you are unfamiliar with JavaFX CSS, click the link to learn more. CSS is very important if you want to make your application beautiful. We will not go further with the JavaFX CSS, but click the given link to proceed if you want to learn more. Also, please move below to learn how to add an inline style to the JavaFX button.
Button btn = new Button("Button");
btn.seStyle("-fx-background-color: black; -fx-text-fill: white;");
Output

Enable and Disable a Button Example
If you want a feature in your application that can disable and enable the JavaFX Button. The setDisable() method is the answer to disable the button. You need to write true or false in the parameter to function it.
// To disable the button
Button btn = new Button("Button");
btn.setDisable(true);

// To enable the button
btn.setDisable(false);
Button Event Example
The JavaFX Button Event is fired or executed when the button is activated through clicking using the mouse or other methods to activate the button. To create an event, we need to use the Anonymous class or the conventional method using the Lambda expression. The Button in JavaFX has many EventHandler, and we can also use them based on our requirements.
We can also use these EventHandler in our application. The MouseClicked, MouseDragged, MouseEntered, MouseExited, MouseMoved, MousePressed, Mouse Released, and more. You may use Scene Builder for your convenience, and in this example, we will use the Action Event. Please proceed below to learn more.
Button btn = new Button("Button");
// Using the Anonymous Class
btn.setOnAction(new EventHandler(){
    @Override
    public void handle(Event event) {
        //Do some magic here
    }

});

// Using the Lambda Expression
btn.setOnAction(event ->(
        //Do some magic here
));





very good tutorial. You can do some with the jfoenix-9.0.10 library, which adds material design functionality to buttons and other elements.
Thank you, yes I will do some jfoenix tutorials next time.